Tuesday, November 30, 2010

Henri's Room Reveal! Plus Our "Hand" Made Artwork!

Back at the beginning of this month, I blogged about my first design assignment to decorate my nephew Henri's room.  I also posted a blog about the inspiration I found and everything I bought for his room. Since our family came for a visit over Thanksgiving I was able to hand over all the goodies for Henri's room.  Amber and Ryan got to work quickly and got his room all set up, so now we can REVEAL THE AFTER PHOTOS!!!

So, again here is the 'Before'


Now, (drumroll) the 'Afters'!!!! 
I was a little sad I couldn't be there when Henri got to see it, my sister in law said he just kept smiling and pointing at all the new things.  When he would point she said he would do his cute little grunting thing, so I think that means he loved it! I mainly added new textiles to the room, so I know I didn't do any big crazy changes but goodness, $150 (you can read the budget breakdown here) of new things to brighten up the room and add color really made a big difference!

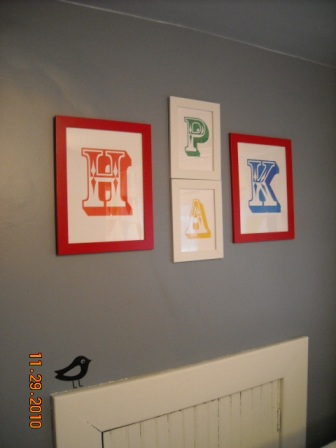
I added Henri's initals to the frames I picked up at Ikea!
We made the cute wall canvas all together while they were in town.  I love sentimental art, and I think this is really special for Henri to have since he doesn't get to see his Auntie and Uncle very much.
 
So this little yellow stool that was only $7.99 at Ikea turned out to be Henri's favorite new thing!  While he was at our house he would sit on it and kick his little legs or he would push it all around our house while giggling. We still have to bring the art easel we mentioned in the last blog to their house, but he is still a little young for that now anyway.
Here is a super cute picture of Henri playing in his fun colorful new room! You can also see the bright new bedding. I love all the bold colors and those curtains are so fun!
Here is a closer view of the handprint canvas and you can see the back wall with the addition of the cloud decals I ordered from Etsy.
 We captured the moment when we made the artwork for his wall, it was so much fun!  Here are Henri's momma in red and papa in green getting messy with the paint!
Auntie and Uncle were yellow and blue!
Alex and I in action!
Henri made orange handprints, it was SO cute when he touched the paint with his hands!  He made the cutest little grunting sound and a scruched up smile!
Here's the final product for Henri's wall (don't you love the little orange blobs from Henri)?!  We all signed the corner with our names and the date.  I hope he loves it as he gets older and holds on to it, you know, like bring it with him to college (hehe, JK)!
So, what do you think?!?!  I've never decorated a kid's room before, but it was so much fun departing from my world of black, white, grey, blue and all things dull and neutral!  Thanks for following up and checking out Henri's room! I really wanted him to have a bright, fun playful space to grow in and I think it turned out amazing and I am happy Amber and Ryan let me help out!

Saturday, November 27, 2010

Simple Steps To Make Your Own Tunic Dress! Perfect For Holiday, Or Any Day Events!

We are departing from the 'Hammers' world for a 'High Heels' blog! 
I mentioned this project in my Thanksgiving day blog.  I love wearing tunic dresses in the winter season.  They go perfectly with leggings or tights and a great pair of boots; belted or unbelted with a bold necklace. I wanted to find a cute one to wear for Thanksgiving since we were hosting dinner, then I thought hmmm, I should just make one! Here is a link to one I liked from BCBG and another from Topshop. I figured it couldn't be too hard, and it wasn't!  Here are the steps so you can make your own, just needs a great belt or necklace to finish the look!
Here is a picture of the finished product on my vintage dressform.  You get a better glimpse of how the bottom hem works.
Here's a closer shot of the necklace I wore with the tunic. Totally love it and it was only $10.80 from Forever 21, great steal!
Here's a picture of me wearing it on Thanksgiving with a cute pair of tights and boots.  I was so happy with the look, very cute and comfortable for a busy day!

Before and After: 1 Year With Sadie Edition

I know we mainly stick to 'Before' and 'Afters' of our house, but today marks a special day in our household!  Exactly 1 year ago today we brough little Sadie home.  She was so tiny!  Here is our 'Before' picture, the first picture we took of her when we brought her to PetSmart.  She was only about 12 lbs, the same size as Rocco.
Here is our 'After' one year later.  She is now about 55lbs, so crazy how much she has grown!  We had Rocco for a little over a year and a half by himself (he told us he wanted a buddy for Christmas last year, hehe).
Having 2 dogs definitely makes our house a little chaotic at times and sometimes all the pretty decor gets messed up, but they keep life interesting around here. 
Last year Sadie couldn't reach our Christmas tree all that much since she was so tiny, makes me wonder what she will be like with a large live tree in the house?  Guess we'll see, getting started on that this week!

Friday, November 26, 2010

DIY Smoke Guard for Our Fireplace

  When we woke up in the morning after we had our first fire in our fireplace, we realized there was a little soot on the ceiling above the fireplace. Which also kind of explains the big smoke stain on the brick (you can see in this before photo of the living room).  Alex did a little more research and found out that the hearth opening to our fireplace was too large in comparision to the opening on our chimney.  The dynamics of home airflow get a little confusing from here, but basically we needed to make the hearth opening smaller so that the smoke would have time to travel up the chimney (instead of into our living room).  

So we took a trip to Woodland Stove and Fireplace to see if they had a Smoke Guard we could install. Here is a link to what a Smoke Guard looks like, it's basically a steel beam that goes across the top of the fireplace that makes the opening smaller.  Woodland didn't have a Smoke Guard in stock, but said they could order one for around $100, but we wouldn't get it in time for Thanksgiving.  The gentlemen working there were really nice, and even taught us more about airflow and how our nearly 90 year old chimney system works.  They also planted the idea that we could likely make a Smoke Guard ourselves... DIY Project?!?!  We love them!

Alex went to the ol' Home Depot and got what we needed to make the Smoke Guard.  Here is Alex with the 2 pieces of steel construction joists. These joists will be sandwiched together to make the Guard.
Alex took measurments of the fireplace opening before cutting
After taking measurements, Alex retreated to his 'Gentlemen's Cellar' (did you hear? Man caves are out, Gentleman's Cellars are the new thing) in the basement to cut the steel.  Just an FYI, our basement is unfinished, Alex uses the large room with our boiler as his sort of Gentlemen's Cellar/ workroom. 
Alex had to cut the steel using a hack saw and some heavy duty metal snips.
Alex took the 2 halves and pressed one inside the other to make the Smoke Guard more rigid.
Alex used Rutland High Heat Silicone and guide screws to secure the 2 halves together.  Then used the black High Heat paint for a fancy finished look.
After he applied the silicone, he used a work clamp to tightly press the 2 halves together to allow for drying.
After drying, Alex applied the High Heat paint (because we didn't want a chrome Smoke Guard in our living room).
 He used Loctite Adhesive and the High Temperature Silicone to seal and adhere the Smoke Guard against the brick.
Then it was time to install the Smoke Guard!
He used a rubber mallet to wedge the steel smoke guard into place.
He used the Silicone again to seal all the gaps around the front and back of the DIY Smoke Guard- this is a must so no air/smoke can flow through.
Here is what the fireplace looked like before.  We featured the fireplace damper control in the last blog, but you can tell the difference in the 2nd photo with the Smoke Guard.
See the difference with the steel panel? Not a huge visual impact.
But with another fire, big impact!  So beautiful and no issues with smoke with the new Smoke Guard, love it!

Thursday, November 25, 2010

A Very Happy Thanksgiving!

Happy Thanksgiving blog friends!  We are having a blast with our family and I hope everyone else is too!  I just love it when we get to share our home with family since it doesn't happen often living so far away.  An extra fun part of this visit is seeing our nephew Henri! 
 It is about 2:00pm here in Minnesota and we are having our appetizer/ munchies before the big turkey dinner.  I made my favorite fruit and cheese plate... smoked gouda, baked brie and cranberry goat cheese...YUM! (did I mention cheese is my favorite food?)
Here's a picture of me with my cheese (it's cheesy I know).  But I had to show it because I made the tunic dress I am wearing, and totally love it!  I will post a blog in the next few days with the DIY steps showing how to make it!
 Alex has been slaving in the kitchen all morning and just got to the turkey.  He gets all the credit for our Thanksgiving Dinner, he is the head chef in our house and loves to cook.  Yep, he renovates our house and cooks lovely meals, total package or what?!?
I will update this blog after we get pictures of our Thanksgiving meal on the table!  I can't wait for turkey!!!

*UPDATE*  Our Thanksgiving dinner was amazing!  Although my centerpiece did not fit on the table so it wasn't as cute of a spread, too many yummy dishes! 

Here is Alex craving the turkey, it was great and we have tons of leftovers!
I thought this was adorable and had to share, Henri loved hugging Sadie and I can't believe she stood still for it.
Here is our Thanksgiving family photo for 2010. We had a blast cooking eating, playing games and watching Christmas movies, what a wonderful day!

Tuesday, November 23, 2010

Our DIY Thanksgiving Centerpiece and Sideboard Decor!

We are so excited for Thanksgiving on Thursday, mostly because we have family coming all the way from MI!  We hosted Thanksgiving last year for the first time and had so much fun cooking dinner together. Sadly, I didn't do any decor for our family gathering last year, so this year I am giving it a try for the first time!  I am really excited about what I ended up putting together!

I wish I had taken a before photo (when the glass was empty), whoops! I got this large hurricane glass from Target for $12.99 and put a smaller glass and candle inside.  Then I added some artificial leaves I bought on clearance at Joanne's and wrapped some twine around the glass.
 Here's the cool part!  I got some inspiration for this one in the Pottery Barn catalog.  I weaved some black and white photos of us and our family that will be visiting in the twine.
I think it will be a sweet surprise when our guests see it! 
 I love sentimental art and decor, and I really love this centerpiece!  The photo below is one of my favorites, it's of Alex and our nephew Henri- he is wearing a shirt that says 'My Uncle Got Me This Shirt Because He Loves Me', hehe!
 Here is our Sideboard Decor. I added some dried corn, wheat, a dried wreath and tied artificial leaves to the candles with some twine. The coolest part?  That little chalkboard to the left, yep that was a DIY item! I love my DIY antique chalkboard. I just had to make another, a little one this time!

 I got this piece of wood with rounded edges from Michaels for $5
 Got my trusty chalkboard spray paint for $3 and then sprayed away!
 Here is the little chalkboard after drying and adding a cute Thanksgiving message. Sigh, I just love it! 
Oh Boy!  There is still more Thanksgiving fun to come!