
Since I'm still waiting on the new kitchen rugs I ordered earlier this week, I decided to keep busy with a few sewing projects I've been thinking about for a while. First up, a new take on my Versatile Zippered Clutch DIY (check it out if you missed it!). This time, I increased the size and added a handle strap making it perfect for carrying a laptop alone or with a whole-lotta other stuff inside!
Totally beats using a boring laptop case right?!

Onto the tutorial! One thing to note, I constructed this clutch a bit differently than I did in my first clutch DIY and I think this version is a wee bit easier for constructing the basic zippered clutch part so even if you aren't attaching a handle strap you can still follow this too!
First, cut a single piece of fabric to make the clutch (fabric will fold in half). I based my measurements off of the size of my laptop so I cut a piece measuring 26.0" L x 16.0". Once the fabric is ready, fold it in half (exterior fabric out as shown below) and pin the zipper on the top edge.
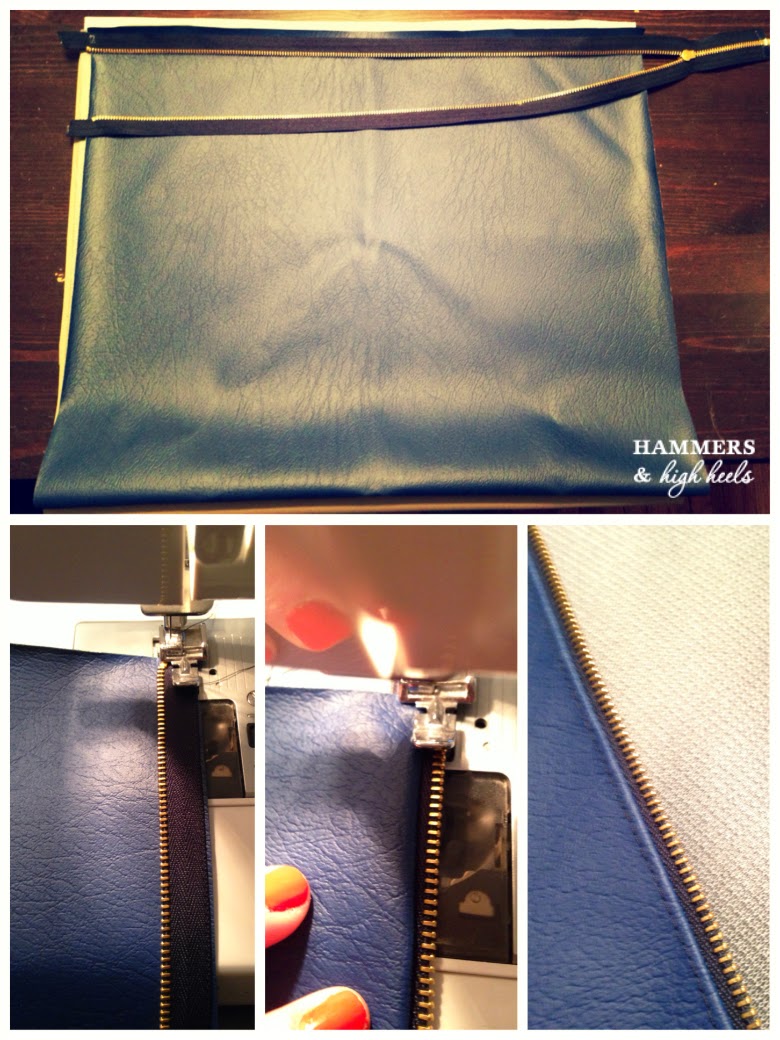 With the zipper pinned in place on each side, it's time to stitch in place. To do this and get a clean finished top edge, first stitch the zipper with the metal portion of the zipper facing the fold/bottom of the clutch (left photo above). When that line of stitching is complete, flip the zipper/top edge over so the zipper teeth no longer face the fold/bottom (middle photo above). Then do another clean line of stitching, this will give you a nicely finished top edge where the zipper attaches to the bag (right photo above).
After the zipper is attached to both sides of the top edge, fold the bag in half with the interior of the bag showing (left photo below), pin the fabric together and stitch both side edges of the bag.
 Once both sides of the bag are sewn together, turn the bag right-side out. Woo-hoo you have the clutch complete!
Now, let's add the handle strap. Start by cutting a single piece of fabric to make your handle (you will fold in half like the bag). I cut my handle to 7.75" L x 3.5" W, so the completed handle would measure 7.75" L x 1.5" W. The tricky part is that you will fold the fabric, but not in half. Fold it so you get the width you want and have 0.5" excess (see right photo below). You will stitch along the folded edge and then fold the excess 0.5" over the raw edge and stitch in place (shown in middle photo below).
 After you finish those steps, turn the handle over so the clean folded+stitched edges are facing up (right photo above).
Time for the final step! Pin the handle wherever you'd like it to be placed on the front of the clutch and stitch in place.

That's it!!!! Not too bad right?
Pretty simple and makes for a much more stylish way to tote around a laptop!

What do you think? Are you liking the new clutch DIY?
What other cute clutches or tote bags have you been seeing lately?
What style I should DIY next?!?!
I've pinned a few clutches and tote bags I want to try sewing next, who knows maybe I'll have another tutorial for you tomorrow?! Heck I'll still be waiting for my rugs, oh the torture!!!
Totally beats using a boring laptop case right?!
Onto the tutorial! One thing to note, I constructed this clutch a bit differently than I did in my first clutch DIY and I think this version is a wee bit easier for constructing the basic zippered clutch part so even if you aren't attaching a handle strap you can still follow this too!
First, cut a single piece of fabric to make the clutch (fabric will fold in half). I based my measurements off of the size of my laptop so I cut a piece measuring 26.0" L x 16.0". Once the fabric is ready, fold it in half (exterior fabric out as shown below) and pin the zipper on the top edge.
After the zipper is attached to both sides of the top edge, fold the bag in half with the interior of the bag showing (left photo below), pin the fabric together and stitch both side edges of the bag.
Now, let's add the handle strap. Start by cutting a single piece of fabric to make your handle (you will fold in half like the bag). I cut my handle to 7.75" L x 3.5" W, so the completed handle would measure 7.75" L x 1.5" W. The tricky part is that you will fold the fabric, but not in half. Fold it so you get the width you want and have 0.5" excess (see right photo below). You will stitch along the folded edge and then fold the excess 0.5" over the raw edge and stitch in place (shown in middle photo below).
Time for the final step! Pin the handle wherever you'd like it to be placed on the front of the clutch and stitch in place.
That's it!!!! Not too bad right?
Pretty simple and makes for a much more stylish way to tote around a laptop!
What do you think? Are you liking the new clutch DIY?
What other cute clutches or tote bags have you been seeing lately?
What style I should DIY next?!?!
I've pinned a few clutches and tote bags I want to try sewing next, who knows maybe I'll have another tutorial for you tomorrow?! Heck I'll still be waiting for my rugs, oh the torture!!!


No Comments Yet, Leave Yours!
I love to hear from you! What's on your mind?