Monday, January 31, 2011

My High Heels Are Homeless

It has been a rough couple of days in the Hammers and High Heels DIY world.  Our Spare Room redo hasn't been going as well as we had hoped. We were in the beginning stages of setting up my new dressing room.  Before we took our trip to Home Depot for the supplies we looked back at my inspiration post to get an idea of what we should look for.  We thought these basic metal brackets and boards would do the trick, they had a similar look to the metal and wood shelving I loved from the inspiration photos.  They also were pretty inexpensive (lesson learned; low cost DIY isn't always the best idea).
Once we got the shelves up we both just cringed, even Rocco had a look of horror on his face.  I imagine he was thinking something like, "Mom, you guys can do better than this, nothing in here looks cute but me" - yep I just quoted my dog, uggghhh, it IS a really lame day!

Even though we didn't think it was quite right, I started organizing my shoes on the shelves to see if it made our vision look any better and even put my antique dress form into place. Our concensus... a classic case of the shoe not quite fitting right.

It still looked like crap.  CRAP!  The two main problems were 1- the shelves themselves, they just didn't look nice at all; and 2- the awkward huge space above the top shoe shelf.  So maybe we didn't measure and place them as we should, but we are also thinking that this wall shouldn't have shelves on it anyway.
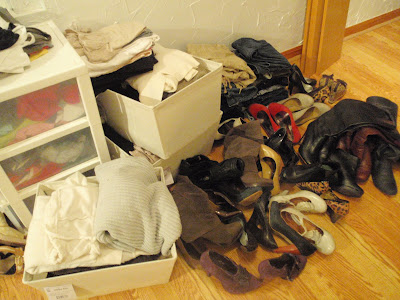
So, we are starting over with this one.  My heels and everything else are now in this lovely heap on the floor.  We get a huge FAIL on this one.
The good news is we have a new plan, and yes, we hope this one works!  So, thanks for following up with us on our room redo, and if you have any ideas for us please let us know!  Here's to hoping this week and our new plan goes a little better!

Saturday, January 29, 2011

From Fitting to Function; A New Gig For My Antique Dressform

The inspiration for this was right under my nose in my own blog!  I can't believe I didn't think of it sooner!  So, I was looking back through some older blogs and found this picture in my Sights From Junk Bonanza post.  I thought, hmmm, I could do that with my beautiful Antique Dressform (the one Alex surprised me with) and turn it into storage for my belts and necklaces!  Not to mention it would double as decor as well!

The only bummer meant we would have to take it out of our Guest Room.  It looked perfect where it was in our Guest Room, but I think it could only look better in our Spare Room since it goes along with the theme.  We also got some feedback from a recent Guest (aka my Mom), that the Dressform looked a little spooky when she woke up in the middle of the night, like there was a person in the room.  Point taken Mom.  So, we are moving the beautiful Antique Dressform from its spot here in the guest room to the new Spare Room.
There hasn't been anything fun about moving around our closests and all the stuff in them.  But I'm not going to lie, this was sooooooo much fun!  I was pulling out my belts and necklaces and accessorizing my dressform.  

 I loved the Dressform before as is, but this gave it some pizzaz and more of a purpose.  My necklaces sure look a lot nicer here than in a pile in my jewelry box.


Sigh, I just love this idea, and I can't wait to add it next to my shoe shelves!  It's shaping up to be a really neat space! 


We are finishing up the shelves and are in process of moving everything from both closets.  It is a colossal mess in our bedroom right now, but I'm super excited to get it all organized so I can take pictures soon!

Wednesday, January 26, 2011

Closet Confessions

Oh dear, my stomach is kind of in knots thinking about posting this and showing the mess, but I think it has to be done.  Since part of our Spare Room project will be creating a closet space, I thought it was appropriate to show you what we are currently working with and why we desperately need the extra storage space.

Back when I wrote the first post about our Spare Room I showed this picture of the doorway to the Spare Room from our Master.  Those cute doors to each side are our 'his' and 'her' closets.  They are pretty cute because they are original to the house and should never be changed; except there is nothing cute about a closet that measures 33" x 40"!!!!  That is one of our biggest complaints about living in our old house, NO CLOSET SPACE!!!!
So we had to get creative, and here is where that 'knot in my stomach' feeling comes in.  I feel a little embarrassed to be showing where and how we store all of our crap stuff.  Why?  Because it certainly is not cute or organized- and I pride my self on my organization skills. 

So here is where we stand today with our existing closets, and thankfully we are currently working on a solution!  I will let Alex go first!  

He has all of his dress shirts hung on a very small bar (can you see that the right side of his closet has the Dutch Colonial slant/dormer, so his closet is even smaller than mine). Then he has Ikea wire baskets filled to the top on the left side, jeans stacked right on the floor so you can't access anything behind them, then old Yaffa blocks on the left (remember those.."Go Yaffa", I had a bunch from my dorm in college that have followed me since) holding all of his t-shirts and what looks like a messy wad of stuff towards the bottom.  I have not a clue how he finds anything- oh wait, I DO know.  When Alex can't find something I end up seeing him toss a pile of stuff (while swearing) onto the bed to sift through and find his 'needle in the haystack'. Sorry honey, you know you do!
Alright, now it's my turn!  So here it is, itty bitty closet #1 (I had to use 2)!  Notice you don't see the wall at all?!?!  I have all my clothes packed so tight in that little space.  I hang all my shirts on the hanging rod, sweatshirts and jeans up top, scarves covering the wall to the left, necklaces and belts on the back of the door, and tons of random things in the drawers below. Usually, when I pull something out another 1 or 2 things would come with, so annoying!
Now here is itty bitty closet #2 which is in our guest room.  There was no way everything could go in just one little closet, and it has been really annoying having to search through 2 rooms to put an outfit together!  So in this one, I mainly stuffed away sweaters, dresses, jackets, shoes, and purses up top. I always felt bad too if we had guest come that wanted to hang something up and they opened the closet to see this cluster.  Other than those 2 closets I switch out seasonal things (like swapping the sweaters for shorts in the warm months) in a giant storage tote in the basement, doing anything I can to maximize the space!
It truly was a sad state of affairs.  I am so glad to report that I am getting ready to move on out of of those 2 itty bitty closets, so we should have fun pictures to show soon!  Alex has been hard at work, I think he is also excited that he won't have to hear me yell "Avalanche!!!!" every morning. 

So, I guess I still think it is embarrassing, but I can't wait to show the 'afters' which should paint a much better picture!

Tuesday, January 25, 2011

A Peek Inside Rachel Ashwell's Shabby Chic Store in Soho

 I was in NYC for a quick trip before the weekend.  I got a chance to walk through the Shabby Chic store in Soho and had to share the beautiful images!  I have been in the store once before and both times, when I walk in and I don't quite feel like I am in a store, it is just so soft, cozy, and beautiful inside! 
I think even someone that wasn't a fan of the Shabby Chic look could walk inside and be 'Oooo-ed' and 'Awww-ed' with all the character and details.  So take a peek inside with me, here are a few things that I just loved ...
Romantic chandeliers, chippy wood furniture, oooo... gorgeous!
That rustic barn door with mirror hung from the sliding brace, not to mention this overall space, just beautiful!
Antique style china, crown top bottle openers, cozy wrinkled linens on the table
I think this photo does a good job showing how it almost doesn't feel like you are in a store. I Love all the details on the tables, sofas, and light fixtures.
More romantic chandeliers and those wooden chairs were just so cute!
I was in love with this chippy bench next to a dining table.  Also the ruffled table cloth.
These linens were on the bench with a cute vintage ribbon and broach tied on.  I loved the ruffle details with lace and raw edges, just lovely.
I had to share this because I thought it was such a cool idea.  So, this looked sort of like a sectional couch/ day bed with lots of pillows...
But when I took a closer look I was very intruiged.  The mattresses were on some sort of chippy wooden platform with rolling wheels.
I had help getting a closer look; here's what they were on.  Isn't that just plain cool?  I loved the creativity putting this relaxing sofa-like idea together. Just looked cozy, yet industrial.
Okay, on to bedrooms now.  Alex and I are still trying to figure out what our master should look like and I felt totally inspired here.  All the beds were mainly made up of fluffy white linens with lots of details.  This just looks so romantic and beautiful.  I love that tufted headboard as well! 
I should put this nightstand on my wishlist.. but probably won't happen.  Isn't is amazing?!?
More beautiful detailed white bedding, just yummy!
Closer look at another beautiful vintage inspired nightstand. I also liked the lampshade, I looked like they added lace over a plain white shade, great idea!
This was another cute one, loved the headboard and the light pink floral print (although I know the hubby will not go for any pink ideas).
This one was a mix of white and blue, all the fabrics felt so soft, cozy and rich, just amazing!
Here is my last photo.  I have to show this bench that was at the end of one of the beds.  I would love something like this.. maybe Sadie could even sleep on it instead of hogging our bed... that would be REALLY nice! Hope you enjoyed the peek inside the Shabby Chic store!


Monday, January 24, 2011

The Most Glamorous Home Depot I've Ever Seen!

I realize this is sort of stupid, but I was way too amused with this to not share on our home improvement blog.  During my recent trip to NYC, I saw the fanciest Home Depot I have ever seen while riding in a cab through the Flat Iron District.  As we zoomed by, I saw it out of the right side of the cab and yelled out "Oh my GOSH, look at that! A Home Depot, WOW!!!!!" while grabbing my camera and doing a 180 degree turn to get this quick photo. (Keep in mind this was only my second time in NYC)
 I think the cab driver and my coworker thought I was nuts for getting so excited, but I had no idea there would be a Home Depot in NYC! Makes sense though, I guess people need Home Depot everywhere, but it just looked so fancy compared to the normal ones we frequent for our Home Depot Adventures.  I think all they are missing is the lumber department.  Here is a better photo of the one I saw located at 40 West 23rd Street.  Upon looking up this photo I also read that it has 3 floors, escalators, and a much higher end assortment of appliances, sinks, countertops, tiles, and well just about everything.  That makes sense for New York I'd say.
It was also sort of funny that when I called Alex that day, the first thing I said was "I saw the coolest Home Depot today, I can't wait to show you pictures of it!" So funny the ol' HD is so close to our hearts because of our little Dutch Colonial.  Anyway, thanks for sharing in my dorkiness!  Too bad I didn't get to stop in, I bet it's not weird to wear high heels at this HD!

Saturday, January 22, 2011

Step Into The Light (And Airy Side of Our Sunroom)

Phew, sorry I haven't posted in a while, I was in NYC for the past couple days (which means I might have some fun store photos to post soon!). Here are those before and after pictures of our Spare Room with the new window treatments that I promised. 

 Here is after we put up the window treatments. Don't the longer drippy curtains give the illusion that the windows are much bigger?  PS- you can see some of the supplies we are going to be using soon!
 Here's the 'before' from the other direction
And after. I still don't think it is quite perfect yet. I might have to add 2 more panels; one at each end.
This is a close up of the rod pocket I had sewn for the curtain. Oh, I should add that we hung the sheers on the old curtain rods that were there before. We hung them behind and a little lower than larger curtain rod (that was free, yay!).
 I think we will be replacing the white sheers soon (hopefully). Right now it is the cheap "mosquito net" curtains from Ikea and I would love to replace them with nicer sheers soon, maybe ones with a pattern or texture on them.  But so far the room is feeling a little more, well 'roomy' the curtains really helped cut down on the echo in there too!
Things have seen crazy busy for us since we have been working on this room and I had been traveling quite a bit.  Things should be calming down for a while, so I hope we can get started on the next steps soon... looks like Alex is going to be building something so we might have a good DIY post coming up!

Tuesday, January 18, 2011

Flooring? Check. Privacy? Yes Please!

We blogged about installing our flooring a week ago and haven't posted anything about the Spare Room since.  Are we slacking??? No way! Nothing is stopping me from my new closet/ dressing room, hehe!  We were busy getting out and about picking out a few necessary items to continue our work on the space. I'm happy to report that we have gotten the window treatments installed and checked off our list! All on this very Tuesday night!  A little crazy? Yes, but I just had to share my excitement!

My inspiration for the window treatments came from Beach Brights 'Chain Link Fence Curtains'. They looked great in the very long and narrow space on her screen porch, and I thought it was a great way to add more fabric/ texture to the room and even cut back on the 'echo factor'.  
  We didn't get the same materials though, but went with the overall look.  Here is a picture of what we picked up from our favorite Swedish home store.
 
We picked up 2 of the Vagen curtain rods because they can extend to 12 feet and were only $9.99 each!  Since our room is so long (26ft total) it made sense to get the most bang for our buck and get the long curtain rods. For the curtains, I ended up choosing the Lenda ones from Ikea for two reasons. The first being that we already have a pair just like them in our living room and LOVE them, they are so neutral and have a nice texture to them (I never wrote a blog about them, but you can see them in this blog from November covering our slider doors).  The second reason- price, you can get a pair of these for only $14.99, steal!!! Also, they are pretty large, last time I had to hem them since our ceilings aren't very tall. I was even able to make decorative pillows with the excess fabric that I cut off, I added them in our Guest room...
We moved our Pottery Barn pillows that Layla used to decorate our guest room back to the living room (in case anyone wondered) 

Back to the windows...So our total for our window treatments so far came to about $50, not too bad considering you can spend that much on one window.

Then the measuring and mounting began, this was all Alex!
 Look at him go! The spacing for each bracket was about 6' apart.
I quickly made my measurements and got over to the sewing machine. That's right, my job during this time was sewing the curtains at the top to make them a rod pocket instead of a tab top. I'm not a fan of tab top curtains, looks like band-aids or something to me, just weird.
 
Then I cut off the excess fabric, sadly not enough extra for pillows or anything else fun this time.
Wait, I take that back!  After Alex got done hanging the brackets and getting the two curtain rods up, he was waiting for me to finish cutting, sewing and ironing the curtains.  So this is what he did with the excess fabric and time...
Yep, Alex did some Glamour Shots with Sadie.  Sadie got some sort of tie and skirt combo with the tab top part of the curtains... it was interesting, at least humorous while we were working on this room at 9:00pm on a Tuesday night.  I got him to focus again and he helped me get the curtains up.
Here is a peek at the room now, I didn't want to do before and afters yet because taking the photos at night doesn't really make for a good comparison (my camera takes crappy pictures at night if you haven't noticed).
Looking a little more fabulous?!?!  Getting there, oh, I forgot, we did pick up something on our trip to Architectural Antiques.  See that gold framed mirror on the floor?  That is what we brought home, thought it would be a nice glamorous addition to my dressing room space, and it was only $20!  I will get some before and afters posted this weekend when I will hopefully see some daylight! Hope to finally get my rolling racks too!
Well, it is almost 10:30, this working gal needs to catch some much needed Zzzz's, goodnight!

*** Project Parade at DIY Showoff!!!  Check 'em all out!

Sunday, January 16, 2011

Architectural Antiques

 Alex and I recently discovered antique and architectural salvage stores in our own backyard.  The Northeast Arts District is full of them!  One of the stores we visited that we loved was Architectural Antiques on 14th and Qunicy.  We have been to a similar store before called City Salvage on First Ave in NE, but the size and amount of salvaged goods at Architectual Antiques was amazing!  Their website even shows Design Ideas for the antiques and even some of the case histories of the buildings they have salvaged.

Alex and I stopped in to see if we could get any ideas for the Spare Room Redo.  We cruised around the store and took a few pictures.  I'm not going to lie, the prices on a lot of the items were pretty steep, but bear in mind that all of the salvaged items were truly pieces of history (Some more than 200 years old) and each piece telling a story all it's own.  Here are some of my favorite pictures...


Lots of items salvaged from churches...

Even the front door and frame of an old house!

I though this wood booth may have been similar to what might have been in our kitchen nook?
Rows and rows of salvage antique doors.

I couldn't believe how many antique doorknobs, door plates, hinges, and other 'house jewelry' were on these tables... crazy!

Check out this old Murphy Bed with door frame included.  Does anyone else think of Full House when they see Murphy Beds?  I always think of Uncle Jessie and Aunt Becky living in the attic with their Murphy Bed... which is really weird when you write it all out right?  Anyway...

Antique vent covers, just like the ones from Amber and Ryan's cute 1907 Bungalow.
 Lastly, look at the size of this stained glass light fixture!!!  I think it would be the size of our entire dining room!  I wish I could have found out where it came from?


Well it is Sunday morning, Alex and I are about to head to the ol' Home Depot to pick up a few things for the Spare Room.  Hope to post a blog this week about our progress and maybe our design/ color scheme for the space.