Showing posts with label My Dressing Room. Show all posts

Wednesday, April 10, 2013

Sacre Bleu! Drab to Chic & Fab Blue Dresser DIY

I finally got my rear in gear over the weekend and painted that $10 campaign dresser.  I'm so happy that I no longer have to look at that dull beat up dresser- why-oh-why did I wait so long ?!?!  The fresh blue look is sooooo much better!
I guess my only reason for dragging my feet on the project was because I couldn't decide on a paint color.  Each one looked perfect and I loved them for different reasons.
After much deliberation, I decided to go with a glossy and rich navy blue.  I figured it would be a good color choice in case I end up using it in a different room in the future. Navy is a bit more versatile than red or pink- even though that would have been fun! 

I picked up two cans of Rust-Oleum spray paint at Home Depot and hauled the dresser outside for painting.
Sadie managed to photo bomb with just her nose :) stealthy and sneaky!
I pulled out the drawers, sanded the surface to get it roughed up, and removed the handle hardware.  The bummer was that I couldn't remove the brass corner details.  They seemed to be glued on so I had to cover with painters tape which was a long and annoying process, ugh!  Then I started spraying...
I did about three coats and let it dry overnight.  I was so excited to bring it back up into my closet to see how it looked, thankfully I was not disappointed.  The fresh paint totally changed the look and it fit so much better in the space!
One other little change/detail I added was this antique bracelet I got from blog friend Mimi-Toria Designs.  I loved the look of the black tassel on the green dresser above, but wanted to add a unique and personal detail of my own.  I don't think anything else would have looked more perfect!  Love how jewelry can also be house jewelry too!

I think the new rich blue look fits in nicely with all the other closet goodies I've got going on... BUT I still haven't picked out my window treatments, rug, or a cute decorative pillow to jazz up my refurbished antique chair
Those are the wanted items on my list before I plan to take "after" photos.  I guess they are little details but I want every little bit of my closet/dressing room space to be uniquely me!  So I hope you can be patient with my picky-ness until then :)  For now...

What do you think of my $10 dresser's new look?
What do you think of the color choice?  Like it or hate it? 
What do you think of the (house) jewelry added on the dresser?

I'd love to hear what you think, don't be shy now :)
Furniture Feature Fridays

Monday, March 18, 2013

Curtain Rod Shoe & Scarf Storage... and Pig.

Alright I admit it, I was a total loser this weekend.  I didn't work on anything, I didn't get anything done, and worst of all, my closet/dressing room looks just like it did when I posted that preview photo.  Ugh, zero progress makes me feel like a total loser... I'm going to blame the Leprechaun that kidnapped me Saturday night and made me celebrate St. Patty's until the wee hours of Sunday morning.  Evil Leprechaun!

Anyway, I wish I had a more completed look at my Dressing Room but for now I thought I'd share a rod-iculously brilliant DIY storage idea that I incorporated into my new space!   The best part- it's low cost and perfect for shoes & scarves!  Who knew curtain rods and brackets could do this?  Take a look...
Yep, you can store heels, wedges, platforms, pumps, booties, scarves and more!  I know I probably have too many, you do too though right?  Thankfully, this creative storage solution makes managing my growing collection seem less like clutter and more like a beautiful work of wall art! 

To make my shoe and scarf storage, I hit I kea for all the curtain rods and brackets.  I picked up four Racka rods in the 47"-83" length for the shoe wall ($2.99 each), four Racka rods in the 23"-47" length for the scarf wall ($0.99 each), ten of these Betydlig wall brackets from Ikea ($1.49 each) and four additional Betydlig rod holders ($0.49 each).  The total, just $33.00!

 Another great part of this project?  I didn't have to bug Alex, I did it all on my own!  I love those kind of projects sometimes, because Alex typically gets all the glory :)  All I had to do was install the brackets on the walls to hold the rods.  For that all I needed was a tape measure, level, and screwdriver. 

For my shoes, I measured and evenly spaced eight brackets to hold the four longer rods (two brackets for each rod).  Then for my scarves, I measured and evenly spaced four brackets but this time I added the $0.49 additional rod holders. 
So, for my scarves each bracket held two of the smaller rods (bottom left photo).  I have to say, having the double bar bracket allows for so much scarf storage!  I also love having them hanging neatly, so nice that they don't get all creased and wrinkly!

What do you think of the curtain rod turned storage?
What other DIY storage ideas do you have hiding in your closet?
Also very important- Did anyone else get kidnapped by a Leprechaun this weekend?

Before I go, I have to tell you that it was pretty difficult getting pictures of the shoe and scarf storage today.  Someone insisted on being apart of the photoshoot...

Does he seem to be rocking some kind of mohawk action?  When I told Rocco (aka Pig, Piggy, Mr. Pig, Mr. Pigglesworth, etc.), "Move Piggy, you're in the way," he just circled and stuck his face back at the lense.  Silly Pig, such a ham!  A bit annoying, but his cuteness made up for it.  Hope Rocco/Pig made you smile too!   After all, he's convinced that he's the main attraction :)

Wednesday, March 9, 2011

The Dressing Room Is Complete! Before and Afters, Clothes, Shoes, Decor, and More!

I finally have a dressing room!  Kick up those Heels!!!  I'm just loving the new space!
Let's take a few closer looks and take a trip down memory lane...
Here is that antique crate I talked about in my last post now looking a bit more fabulous with some high heels!
Can you believe this thing holds 17 pairs of shoes?!?
It is so cute and serves a very big purpose for shoe storage!  Love it!
I love the way the crate also compliments the DIY vintage inspired crate shelving Alex and I made (sitting just to the left behind the Ikea mirror).
Here is a close up of the faux sheepskin rugs I picked up at Ikea.  My toes sure love them in the morning when the floors are a bit chilly!  Thankfully Sadie is finally leaving them alone too!
I think the addition of the Stave mirror from Ikea has proven to be way worth the purchase!  I love using the stool and mirror when I am getting ready in the morning. 
My antique dressform still amazes me! Best way to store/display my necklaces and belts!  Swoon!
Vintage feel with fashion and shoes... Sigh, I am so in love!


Now, let's take a trip down memory lane
Remember back in November (holy moly, can you believe we first started this process in November?!?) we asked what the heck we should do with this room? This is what the room was looking like back then, icky carpet and NO personality!
The majority of the comments we got said we should be turning the space into a closet, sitting room, or divide the space.  We obviously decided on all the above to suit our needs.  Check out the original plan and inspiration here!

Alex got to work ripping out the carpet since we knew that ugly stuff had to go!
He then installed some laminate wood flooring, sooooo much better! This part was the most expensive of our redo of course, you can check out that post for all the steps.
Thank goodness I don't have to deal with this anymore!  Alex happily took over both closets in our master. 
This is a lot more fun to hang around in, not to mention things are way easier to find!

What's next?!?!
If you remember from the beginning, this room is going to be divided into 2 spaces. Thus why we hung the vintage window...
We still have the other half to deal with. Remember, this room is right off our master bedroom.  The dressing room/ sitting area is the perfect idea to sort of create a Master Suite.
Our plan is to make a TV sitting room on the other end.  If all turns out right, I just may never leave this space!  A dressing room and TV!?!?  Talk about the perfect place for a gal to go relax in! 
We'll be posting about this half soon! 

For the all the posts on this space check out the Upstairs Spare Room Redo label.

***We just joined the DIY Showoff's Project Parade!  Link Up and join in!***

Monday, March 7, 2011

Vintage, Handmade, and Ikea Accessories for My Dressing Room

I finally made some headway in the ol' Spare Room Project this weekend!  I was on a mission to get all the accessories and decor I needed to get my Dressing Room finished up.  Thankfully, I was successful!  There is quite the eclectic mix of decor in my soon to be dressing room!  Just the way I like it!

So here's what I got....

I went on a little antique-ing trip to Stillwater and picked up this awesome vintage crate for only $8.50 at Midtown Antiques.
I dont' have the exact measurements, but it was a really generous sized crate!  I love the handpainted 'Vine Ripened' label on the side. I am planning to use as decor/ storage.
In my inspiration post I showed this image from Arianna Belle, I love that she used an old crate to display shoes.  I am thinking I will do the same with this crate.
Now to my Ikea accessories! 
Last week in Houzz's Ideabook, I read a post about "Warming Up With a Sheepskin Throw".  I thought a Sheepskin rug would be a perfect accessory to warm up the space and give it a little feminine glamour.  I picked up 2 faux sheepskin rugs ($12.99 each), the real deal gave me the creeps since I didn't know if a sheep had to die to make a rug. The faux ones looked just fine.
The only problem with the rugs...Sadie was convinced that these were a toy for her (I guess I should have expected that, they are a little weird).  It took a lot of tries setting them on the floor and making sure she didn't run away with them.  She spent a lot of time 'inspecting' them.
I also picked up this AWESOME mirror name Stave from Ikea for $49.99.  I am soooo happy with this mirror, I love the way it leans on the wall and it is a pretty big size measuring 27.5"W x 63"L.  It really completes my room and gives it a glamorous feel!
The last item I picked up at Ikea was this Dalfred stool for $39.99.  I knew I wanted some kind of chair in the space that would be easy to move around and use.  I thought this stool was perfect and matched the style of the garment rack and antique dressform.
On to the handmade item! 
Here is the vintage inspired sign I made to hang above my garment rack.  It reads "La Vie Dans Le Talons" translating French to English "Life in High Heels".  I thought that was the perfect little saying for my Dressing Room. 
I have to add, the whole time I was painting the sign I kept doing my Nepoleon Dynamite impression and saying "Do the chickens have large talons?" Alex just loved that (JK), but I couldn't help it since le talons is French for high heels, such a weird word!
So here are some pictures making the sign. Before I got started, I just grabbed an extra piece of wood we had laying around in the basement and spray painted it black.
 Once it was dry I got ready to add the text.  I didn't have a stencil for the letters so I used a larger print out as a guide and freehand penciled in the writing.
Then I painted in the letters
Almost finished!
The cursive letters were a bit tougher to freehand.
Once I was done, Alex added some frame hangers to the back and hung it up behind my garment rack.  I love the fun personalized touch it adds to my space.
As you can tell I am almost done with this space!  I'm really happy with the way it is shaping up, I just have to get it a little more organized before I can post the afters, but that is next!  I can't wait to show you the room this week, eeeeek!

Tuesday, March 1, 2011

DIY Vintage Crate Shelving Unit and "C2T39"

About a month ago, I wrote a post about our Vintage Styled Storage Solution for my Closet Room.  Again, here are a couple of my favorite images for the look I was going for...
 And I love the wheels on this little guy...
Since I finally finished the 5 remaining DIY Vintage Crates it was time to make a shelving unit out of all 6 crates! 

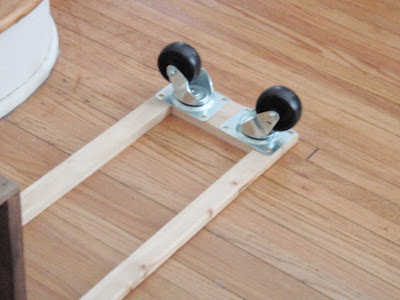
First, lets take a look at what we are going to make first.  This is what the base for the shelving unit will look like (after cutting).  We used left over wood that was in our basement from other projects and I picked up 4 wheel casters from Home Depot for about $5 each.
So to back up, Alex measured the length of the crates and did measurements on where to cut the wood.
Then used his saw to cut each piece.
Here is what the cut pieces of wood looked like when he lined them up as the base for the unit.
He used screws in each corner for a stronger hold.
Then hammered finishing nails into the mid sections where the crates sat next to each other.
Action shot: securing those smaller wood pieces that will act as the base for the caster wheels.
To attach the casters, Alex used liquid nails since we couldn't find any screws that would work with the casters (all of our spare screws were way too long or had tiny heads).
Then he stuck those suckers on!
Once dry, you flip it over, add crates to the top and this is what you end up with!  I plan to stain the rest of the base that we attached so it will look more uniform (just got to eager to see how it looked!).
Here's another look.  I did them lengthwise to increase the storage room. 
And here's a closer look at the 2nd DIY Vintage Inspired Crate (the top one) that I painted letters and numbers on. (click here to see the DIY steps to make your own!).

In case you are curious about this letter/ number combination and its sentimental meaning here is a crazy story about "C2T39". 
Back in 2005 I met Alex one day at work, 5 days later I found out he had gotten in a serious accident on his dirt bike. He had broken his neck, back, shoulder, shoulder blade, collarbone, sternum, a bunch of ribs, an elbow, and really, almost lost his life. He was out jumping sand dunes at Lake Michigan and hit a truck head on. C2, T3, T9 are the vertibrae that he broke. After he laid in a hospital bed for about 2 months, the next time I saw him he was in a halo brace and working on recovering from all the pain his body went through. He also had a brand new perspective on life. I spent a lot of time after that listening to his stories of what the whole experience was like, and overall we grew a lot closer. Hope you liked that crazy story!  Alex really is amazing!

Awkward segway back to the project...

I hope to get the rest of my Closet Room decorated this weekend, then I hope I can finally share afters! What do you think of the shelving unit?

*** We just linked up to the Lettered Cottage's How To's Day Linky Party!***

The Lettered Cottage