Friday, July 26, 2013

Head Over Heels DIY Friday: Brynn's 1st Birthday Ensemble!

Today's DIY is tu-tu much fun and it requires no sewing, woo-hoo!  About a month ago, my sister Holly asked if I would be able to help make a cute 1st birthday outfit for my niece that included a tutu and "1" onesie- Well duh, of course I would! I would have helped to make anything for my little niece's birthday but I was pretty pumped to make a tutu! 

Not gonna lie, I kind of want a tutu for myself for no particular reason, LOL!  But I certainly wouldn't make a tutu look as stinkin' cute as Brynn did on her 1st birthday, just look at this happy little cutie pie...
 My sister picked up the supplies, here is what you need to make the birthday onesie and tutu: - 3 yards of tulle (amount will vary depending on the size and poofy-ness of tutu)
- Elastic
- Plain onesie
- Patterned fabric (small scrap amount)
- Heat n' Bond Iron-on Adhesive
- Scissors
- Number stencil or print out to trace onto fabric

Let's start with the tutu!
Begin by cutting the tulle into 4" wide strip that measure double the length you want the tutu skirt to be.  I measured Brynn's length to be 7.0", so I cut strips that were 4.0" wide and 14.0" in length (this is because you will fold it over the elastic waist).  As you can see in the below photos, I had 6 layers of tulle stacked up so I could get all the pieces cut faster- individually would take waayyy too long for my attention span :)
I also cut the ends at an angle so the tulle skirt would have a little dimension and not be a flat-edged tutu.

Once you have all the strips cut, grab your elastic and cut it to size and just tie the ends together (you can sew if you want to, but I did a no-sew version).  Then, all you do from there is fold it in half over the elastic and tie it on!  It's so stinkin' easy!
Just know if you want a good amount of poofy-ness on the tutu you will be tying a lot of tulle onto the elastic waist- but it is totally worth it! Who doesn't need a poofy tutu?!?

Onto the "1" onesie!
Here all you do is take your patterned fabric, trace what you want to add on the onesie (for me it was "1"), cut out what you traced, and then use the Heat n' Bond iron-on adhesive to add onto the onesie.  Again, super easy and no sewing required!

My little niece looked so dang adorable in her birthday outfit!  I was bummed I couldn't be in Michigan for the party but thankfully I will be able to see her and my nephew Henri one week from today (and possibly meet my new nephew, my sister-in-law is nearing her due date)I can't wait!

Well, I'm Head Over Heels for this tutorial- How could I not be?!? 

What do you think?  Do you love Brynn's first birthday look?
Do you secretly want a tutu too?  Or am I crazy?!

Have a great weekend everyone!

Tuesday, July 23, 2013

A Refreshed Look for the Sunroom

As promised, here is an updated look at our Sunroom now that I've added my newly refinished chairs!  Naturally, with any updated look I always have to take a look back at where we really started (peach paint, ivory carpet, and all that blah)...
... in order to see where we ended up, and I'm loving this rich, crisp, colorful new look!

It's been a long road in this space going from peach walls to gray/blue, carpet to wood floors, radiator to covered bench seat (DIY tutorial here), and then decorating with some simple/vintage muted decor.

 Perhaps my colorful chair redo shows that we are shifting with our style a bit? 
 I know the look is bolder but I'm really digging it!  Although it's crazy to me, I know we've been in our house almost five years now and I think it is starting to get an eclectic look that reflects us, who we were, and who we are now as a couple.... 
Our rooms are filled with a more unique personalized touch instead of all the Ikea product we had when we got into our home and first apartment (no offense to Ikea, we LOVE Ikea, just happy that not every chair, photo, frame, and pillow are from there anymore!).

When it came to this room, who knew that refinishing some crappy old chairs, adding cowhide, a rich colored pillow or throw, and framed photos of happy memories of us and our family members would be the perfect mix of what we needed in our old (and sometimes also *crappy old*) house to make it feel perfect... or just perfectly like us :)


Anyone else know what I mean about a home starting to reflect you and the life you've been living?  How has your home and home decor shaped up?
What do you think of our Sunroom space look since adding the new chairs?
Do you like the color or do you like it more muted?

Lots of change and summer fun updates from us coming soon! Hope you'll be back to hear!

Sunday, July 21, 2013

My "Stupid" Chairs are finally done! Time for Fun Redecorating!

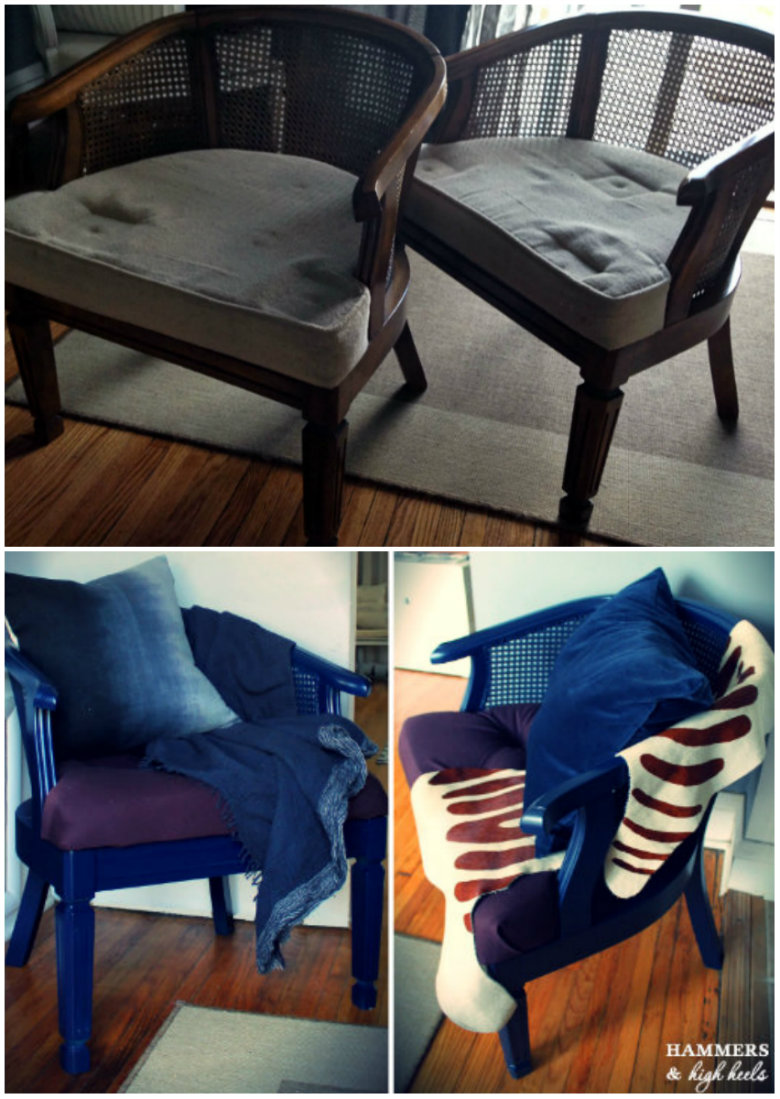
I can hardly believe it myself- My "Stupid" chairs are finally done!  Those icky old $20 yard sale chairs now have some style and that only took about two months (barf!).  After all the failed fabric choices, painting, repainting, and some DIY seat cushion tufting, I now have some chairs that are not only easier on the eyes but heck- I can sit my bum on them at last too! 
Navy Blue velvet cushion cover: Ikea $7.00  |  Navy blue throw: Ikea (no longer available)  | Fur Hide: SR Harris locations $15.00/lb
I finished up tufting the second seat cushion yesterday and then the fun began- I had a new set of accent chairs to play with!  I dressed them up a bit with some pretty decorative pillows, a throw blanket, and cowhide fur (new find from SR Harris, kind of strange but I liked the look, totally different than the cowhide you see at Ikea).  
I rearranged some furniture and added my newly finished chairs into the sunroom by the back entry... and that (as you might imagine) lead to another side project.  Yes, the new color, pattern, and texture got me all jazzed up to revamp the look in our sunroom

The updated chairs are just the start! I can't wait to show you how different this room is looking with some new color and decor! 

What do you think of the chairs?  Do you like the color and tufting?
What else would you do or add in a room with the chairs?

Friday, July 19, 2013

Head Over Heels DIY Friday: Staple Gun Seat Tufting

I attacked a DIY that I've never done before- tufting!  I had always been afraid to try it myself but it turned out to be easier than I thought it would be and I'm very thankful for that considering it has been the only thing that went as planned when it came to my "Stupid" Chair redo project

So, after all the failed fabric choices, painting, and repainting I made the decision to go with a dark burgundy fabric to compliment the midnight navy blue chair color.  But to give the solid color surface some interest and dimension, I knew it was time to figure out how to add some tufting.  Dun-dun- dunnnn....
When it came to DIY tufting, I had only seen folks do it by drilling a hole, sewing on a button through that hole, and a bunch of other random steps along the way which made it seem to complicated.  I wondered if it was possible to get the look just using a staple gun because let's face it, a staple gun is much more user friendly than a power drill (and requires no over-the-shoulder supervision from Alex, LOL). 

I started by marking the placement for each button/tuft that would be on the seat cushion.  In order to make sure the fabric would spread and tuck evenly outward, I marked the first tuft in the center of the cushion and measured out 6.5" from there for the other four tufts. 
Then, I used scissors to sort of carve out the foam in the marked spots.  This allows a clear path for the staple gun to staple directly into the wood surface beneath the foam. 

I added my first staple in that center position so that I could work the fabric evenly outward from there. After I got the first staple in place, I pressed my finger into the spot where the next staple would go to test out how the fabric would lay and fold out.  I did this to make sure I wasn't stapling the fabric too loose or tight.
It takes a bit of folding, pulling, adjusting, and readjusting to get the look of the fabric just right as it folds out from each tuft.  It is a bit tricky but you'll get a feel for it after you do a couple.

Once I had all the tufts in place, I pulled the fabric taut and began to staple it in place on the underside of the seat cushion (stapling into the wood).  This part also called for some more pulling and folding to keep the wrapped edge and center tufts looking clean and crisp.
After you finish stapling, you have a tufted cushion!

The last step is to then add buttons to cover the stapled tufts- and this part is the only unique challenge with the staple gun tufting method (but honestly not as bad as that whole drilling and sewing through drilled holes thing).  Since I didn't have buttons that matched the color and fabric I had chosen, I dug some out from my button bin to cover with the fabric.  I simply cut a small circle of fabric and tied the wrapped fabric to the bottom loop of the button.... 
After I had the matching buttons ready I threaded my sewing needle, pushed the foam around the stapled tuft down, and stitched the button into place.  I learned that it would have been easier to do with an upholstery needle instead of the straight needle shown in my photos because that foam will fight back when you move your needle!

With all the fabric secured underneath, my cushion was complete!  One cushion down, one to go, but here's a sneak peek of the chair color and fabric cushion combo...

I'm already Head Over Heels!  Can't wait to have two of them!

What do you think of the fabric and color choice?  Are you liking the tufting? 

Hope to work on the next cushion tonight and have some after pics of the set along with decorative pillows tomorrow!  I'm excited for this heat wave to break tomorrow, hooray!  Have a lovely weekend everyone!

Monday, July 15, 2013

Pinning, Painting, & Manly-Pinning

Okay, I have some "Stupid Chairs" progress but that is only because of all the nice comments and suggestions everyone offered!  I was in a total rut and feel so thankful to all of you who reached out, so special thank you to Amber, Genevieve, C.E.R., Pine Tree Home, Charlotte, Mdegraeve,   Vanessa, Dyana, Bev, and a couple anonymous others- I really appreciated hearing your thoughts :) I think it helped turn a daunting, poopy, negative feeling project back into the fun, creative project it was intended to be!

With that, it seemed like the consensus was that I should stick with a nice solid fabric for the seat and save the cute patterned fabric idea for a decorative pillow- made total sense, why didn't I realize that?! Because honestly, it's a lot more likely that I will get tired of a pattern in a couple months and want to change it, and that is a lot easier to do on a pillow than on a seat cover.

From there I hopped on Pinterest and started pinning chair styles that I liked.  Here's a little glimpse of the favorites from my board...

Sure, they all look kind of plain but that is exactly what I needed- they all look plain!  They all look something- plain! 

I narrowed in on the look I need, the style I'm most drawn to, and that made the decision to paint the chairs (again) easy... even though I didn't want to.  Yes, I loved the color I had painted them (Rustoleum's Night Tide) but it just wasn't working.  After my Pinterest research, I felt 100% confident in my choice to paint them Rustoleum's Midnight Navy Blue.  Funny enough, the Night Tide to Midnight Navy Blue ombre I witnessed during painting was kind of strangely beautiful....
Right?  The in-between stage looked summery and pretty I guess?  Anyway, from there it went to here...

... and with the sundown, artificial light on, I am all the more happy with my color decision!  It's the right hint of dark blue color in the sun and looks pretty much black/brown when it's gone!  LOL, the rhyme makes it right!
 So, I'm feeling good about where things are at now and it's ready for fabric and finishing!  Woot! 

Lastly, kind of related/un-related but funny either way.  My hubby discovered Pinterest on Sunday and reacted like most people that start tinkering on it do- scrolling, clicking, searching- and dun, dun, dun- pinning! 

Yep, Alex asked how to "save" something and I shared how "pinning" works (create an account, name, boards, etc.).  Despite my it's so easy tutorial, Alex gave me the - it sounds too complicated, I'm zoning out- type of look and opted for his own version of "save" on Pinterest.  So what you see below is Alex's board my Pinterest page, description listed as "I'm not about to start my own page or whatever you call it.  I like a lot of cool stuff though and this is a good place to share."
So, for anyone following Hammers and High Heels on Pinterest, that's the story of how Alex's board came to be (and why that weirdness exists in my pretty board world).  I only hope nothing too strange or offensive shows up on his boards, because yes boys are just weird and gross sometimes (right? it's just a known fact kind of thing I think?).  So Alex knows I will promptly delete and let him begin his own Pinterest union if necessary.  Manly pinning- oh dear!

Until next time- Chair is To-Be-Continued awaiting my fabric application, stay tuned!

But I have to know, anyone else have a spouse/partner/friend/ family member squatting or hijacking their Pinterest page too?!?  Are you letting them keep it or make their own?

Friday, July 12, 2013

Head Over Heels DIY Friday: Window Screen Repair & Replacement

Does anyone else have a not-so-perfect looking window screen at home that is in need of repair or replacement?  I know we do but what I didn't know until yesterday was how easy it is to fix DIY style thanks to my friend/carpooler extraordinaire Dean! 

You might remember Dean from my antiquing/speeding ticket post but we've been co-workers, friends, neighbors, and uber fans of The Golden Girls and the movie Overboard for quiet sometime now.  Anyway, when I heard that he was going to replace some screens after work I said, "Tell me more Dean!" and politely begged asked if I could come over and see how it's done.  Thankfully Dean said okay and I have the DIY steps to share with you today (thanks Dean)!

The materials you need are replacement screening and vinyl retainer (size depends on your window or door) but most home improvement stores carry kits that include vinyl retainer and a handy installation tool!  Dean picked this one up for just $10.97.
In order to remove the screen frame, Dean began by taking down his storm window to access it (note, beginning steps will be different depending on the type of window or door you have the screen in).   
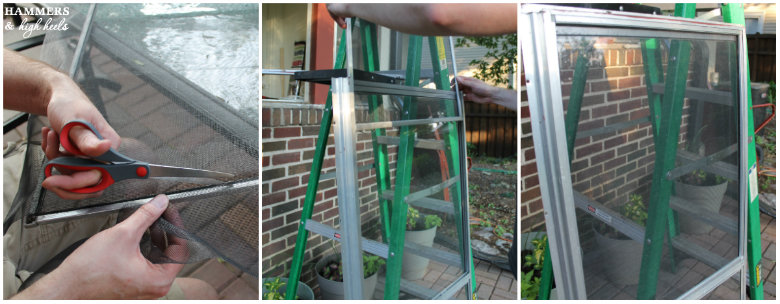
Once you have the framed screen out, remove the old vinyl retainer and take the old screen out.
Then lay the screen frame down with the retainer groove side faced up, place the new replacement screen over the frame with at least 1/2" of the screen extending beyond the retainer groove on all sides (Dean left more than the 1/2" recommendation and trimmed the excess with scissors afterward which also seemed to work just fine).

The next step was to add the vinyl retainer into the groove using the bevel or concave edge wheel on the installation tool.  Starting in a corner and working in one direction all the way around, Dean lightly pushed the vinyl retaining into the groove. 
He also made sure to pull the screen slightly away from the corner he was moving towards to make sure that the screen mesh would lay straight along the groove.

After the screen was installed, Dean trimmed the excess mesh around the four sides.  The, it was ready to place back into the storm window.
Not too bad right?  Maybe I am a nerd for not knowing that screen replacement would be that simple, but now that I know I want to replace the screen on our back sliding door that leads to our deck.  Sadly, Sadie seemed to forget that the screen door existed every time spring rolled around.  The first few warm days we left the sliding glass door open she would run smack into it, poor little simple Sadie! 

I'm Head Over Heels for this DIY knowing I won't have to look at that icky slider door screen anymore!  Just have to hope Sadie won't have the same trouble next spring though I guess?

How about you?
Did you know screen replacement was that easy?
Are you going to replace any window or door screens with a screen repair kit too?

PS- I've been trying to get Dean to do the Golden Girls with me for Halloween for two or three years now, wouldn't we make a killer Dorothy and Sophia?!?!  I hope this convinces him, what do you think?

Tuesday, July 9, 2013

Stupid Chairs

I hate getting stuck on any project, but I really hate it when I get stuck on the small ones that were supposed to be easy.  Case in point, those chairs I got a few weeks ago from a yard sale for just $20 thinking, "Oh I'll just paint them and reupholster the seats, it'll be so easy!"  Silly Carla, you were so wrong.  Yep, those stupid chairs are sitting in our sunroom, still unfinished, and I swear they are taunting me!  Its a stupid chair for poop's sake, why don't I have this done yet? All I have to do is the fabric and paint the wood, that's it! But instead of easy, this is what happened instead.....
Fabric I picked out online. FAIL.
Fabric I picked out at a Vintage Sale. Again, FAIL....
Given that the fabric search wasn't going well I thought I'd just paint the wood a color I liked and then I'd be sure to find a fabric to match the wood color!
Nope, that also turned out to be a bad idea after I spent and hour at SR Harris wrestling through their MEGA warehouse of fabric only to rush as they were closing and quickly grabbed two moderately priced patterns that might work and took them home to show Alex.  As I pulled them out of the bag, I quickly realized the mistake I had made before he had to say "That one looks like grandma print and that one looks like a bunch of sparkly pot leaves." EPIC FAIL.
What was I thinking? I mean seriously? The toile isn't terrible but yea, that leaf is bad, so so bad!  I thought it was kind of like the Palm Leaf print trend I've been seeing but NO, not at all! Now I can't decide which part is worse, the fact that I've wasted close to $70 on fabric or that I may have to sand and repaint the chairs a different color.  Money or manual labor? Hmmm, still both equally bad :(

Either way, I'm just bummed and annoyed at this point.  I wish I was sharing finished pics instead of complaining but I guess that is just the truth- not every project (big or small) goes smoothly or the way you plan sometimes and I shouldn't let it bug me so much... even though it still does, I'm trying to let it go though!

So now it's time to take one last stab and finishing these chairs up.... and if things don't pan out I'm just going to set them on fire in a fit of anger.  Whoops, did I say that out loud?!  I don't think I'd go that far, but I kind of feel like it right now, ha!  I'm thinking I might just have to give up on the colorful idea and go back to a simpler look because that is honestly more my style and I should just go with it!

I'd love any ideas/suggestions!  Really, someone just tell me what to do! 
Do I leave the paint color?  If so, what fabric color or print should I add?
Should I paint the wood a different color?  Then what color or print should I use for the cushion?