Tuesday, March 12, 2013

Dressing Room (2.0) Progress

Anyone else feel like they are playing catch up even though it's only Tuesday?  Yuck!  It's a busy week at home and at work but regardless, I wanted to share a bit of what's been going on with my Dressing Room/Closet project! 

I rearranged the layout of the room, added another garment rack, dresser, bars to hang scarves, wall hooks, and my personal favorite... a wall dedicated to my signature (and in most of the time necessary) heels!  Who doesn't need a place to hang their hat heels, right ladies???

Oh, I guess I have to mention another favorite and that's the $3.00 Vintage Chair I scored from Goodwill that I revamped (click here to check out that redo!).  It has such a gorgeous feminine feel to it, lends itself perfectly for my Dressing Room!

More to come on this space, it's not complete yet!  I hope you'll stop back to see how it turns out!

Friday, March 8, 2013

Head Over Heels DIY Friday: Hand Cut Chinese Paper Wall Art

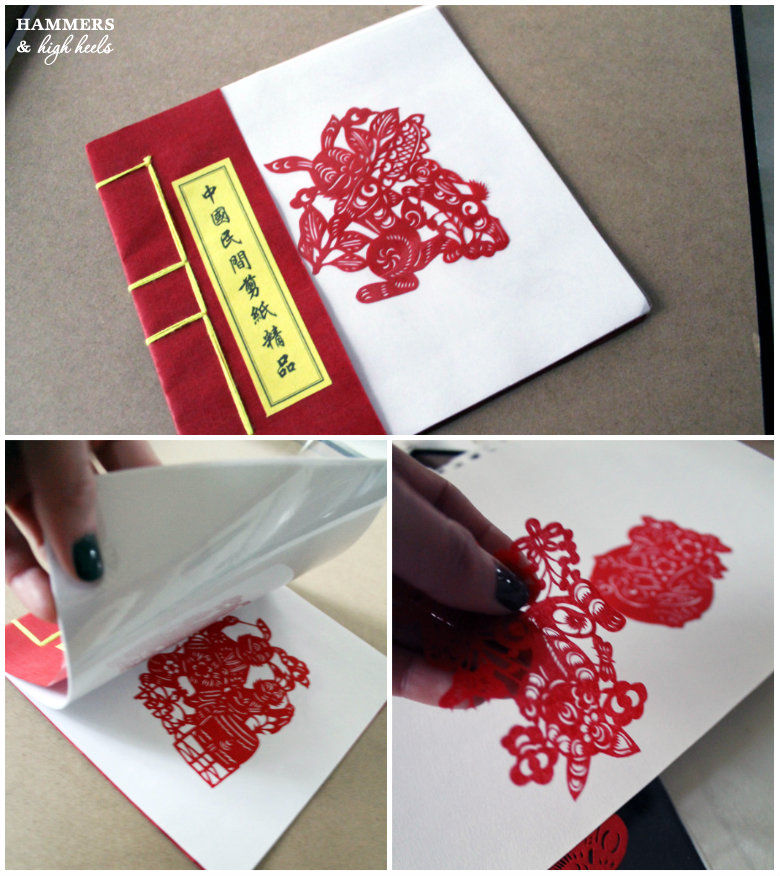
Remember a while back when I shared some of my Decor Finds from China and India?  Well, I finally figured out how to take these handmade Chinese paper cuttings and turn them into a beautiful home decor piece!  So what did I create???

This double layered glass wall art piece!
Thank you again Sunny for the nice gift from Shanghai!
All I got to make this was a double layer glass frame from Home Goods and some thin/wide woven burlap. I placed the burlap between the glass then took each paper cutting out of the booklet and placed them on the burlap.  Easy-peasy! 

I love how the double layered glass allows the hand cut paper to create shadows on the wall behind.  It adds a lot of dimension and interest, just feels like a special way to display this handmade art.  I also realized while arranging the cut papers that they seem to tell a story or set a scene maybe?
All of the characters in my little booklet were rabbits and they were dancing or playing instruments.  They all look so happy, like they are at a big party or something?  I think my favorite hand cut character is that little rabbit with the Chinese symbols (above left photo, bottom right corner).  He looks like he is laughing right?  It's so cute and fun!  I guess it is open to interpretation though as most art is! 

I know I am Head Over Heels though, especially when I discovered the story/scene!

Now, I still need to figure out what to do with this 16" x 24" tapestry I got from the Delhi Haat Market in India .  I just love how authentic and worn it feels, it's a perfect well travelled find right?!  I want to do something more creative than just framing it since it is fabric, but I'm kinda stumped for ideas still.  I know I don't want to sew it onto anything either... 
... hmmm.  Anyone have a fantastically creative idea for this tapestry?!?!  I'd love some help on this one, it's just been sitting folded up in my closet since my trip (sad).

Speaking of my closet, I'll be working on that this weekend and plan to share my first progress pics on Sunday/Monday!  See ya then, have a great weekend!

If you want to see my China & India Trip Photos click here for 2012 and here for my 2013 trip!

Wednesday, March 6, 2013

The Last "Blast"?

Since moving to Minnesota I've always heard people say, "Before spring comes, we'll get one last blast of winter, there's always that last BIG blast."  Now that we've been through six winters here I'd say for the most part that has always been true.  Just when you think winter is on it's way out because it gets a bit warmer outside, the snow begins to melt, the days get longer, and the sun is shining everyday -BOOM- that's when it happens.  Winter comes back and pretty much smacks you in the face.

We got smacked with ten inches of snow yesterday, which piled on top of the half melted frozen snow that was already there.  Why Minnesota, why?!?!  Can't winter just make a graceful exit once and a while?  I guess there's a lot of you out there that might be experiencing the same thing though since the storm headed east.  The good thing is that once the snow stopped falling the sun came out and it was actually quite beautiful outside.... 
Thanks Nick for capturing this beautiful winter sunset in Minneapolis!
Maybe that is winter smiling and saying goodbye? I can only hope so, I'm so ready to get out of the house!  Better yet, our days will feel longer on Sunday because of Daylight Savings!!!!  Did you know it was this Sunday?  Neither did I, but I can't wait for my daylight hours in the evening!

Are you pumped for Daylight Savings on Sunday too?
Did you get hit with the same snow storm that came through Minneapolis? How much snow did you get? 

Monday, March 4, 2013

Unfinished House Projects

Unfinished house projects.... they kind of haunt you right?  Alex and I have two in our house- the Office and my Dressing Room.  Neither one got completely finished up...

Since finishing up our Kitchen Project, Alex and I have been wondering about what we should tackle next.  We both agreed that we should take on one of these projects, at least then the haunting will go away too :) but which one???

So to get you up to speed on what we did and where we left off here's some background....


In the Office room, we did remove the carpet and paint the walls about 3 years ago.  When the tornado happened though we had some water damage in the ceiling and that had to be redone.  After that I decided to change the paint thinking we were ready to turn the room into an Office officially.  (The photos below illustrate the progression)
But, after I painted nothing happened.  I guess during the "Upstairs Shuffle" we ended up losing interest in finishing the Office and ended up working on our Master Bedroom redo.  So, that is one we still need to tackle.    BUT...

I think I am leaning more toward finishing up my Dressing Room (that sounds like more fun, right?).  In case you aren't familiar with the old posts on this room, it is located off of our Master Bedroom and only accessible from it.  Alex removed the old carpet and installed new wood flooring, then we added some window treatments thinking it might be a nice sitting area/reading kind of room.
Sadly, we quickly learned that the long narrow space didn't make sense at all for a sitting room and that it might be better suited for a small bowling alley or closet- especially since we have very limited storage space!

I took a stab at making this dressing room space TWO YEARS ago (yes, slightly embarrassed about this photo, not my proudest creation at all, barf!) and haven't talked about it since. 
I actually ended up taking it all apart not long after and moving things around to make it larger and more useful.   I think I have been tinkering with it for the past two years waiting for it to feel right before I started talking about it again on the blog.  Thankfully, it's finally feeling right!!!! 

I think I'm leaning towards tackling my Dressing Room Project 2.0.  I feel like it's in a good spot to start sharing.  I guess I wish we could tackle both of them and get them completed but we know never break the cardinal house project rule (only one project at a time!).

Are you more excited about the Dressing Room or the Office? 
Do you have any unfinished projects that are haunting you at home too?

Friday, March 1, 2013

Hammers and High Heels DIY Friday: Framed Paper Florals

This week's DIY is all about my inspiration from earlier this week-  paper!  Yes, pretty floral paper creations!  I know it sounds kind of strange, but I'm Head Over Heels for these Framed Paper Floral creations!

All you need to make them is a frame (or two), paper, fabric, scissors, tape, glue (Elmers is fine), and small pins.
To make my framed paper floral creation, I started by making the individual flowers.  I used the floral shapes from my inspiration post and focused on making four types of flowers in various sizes.  I nicknamed the types of flowers petal, accordion, circles, and 4-fold. 

First up is the petal- Cut 4 drop shaped petals, pinch the narrow end and glue, then glue the dry petal ends together.  You will have to sort of hold the four petals together until the glue dries a bit.

Now to the accordion- Fold up a square piece of paper accordion style, staple through the center, with scissors cut the front side at an angle on each end, then open and glue ends together.

For the circle style flower- start by cutting circles in varying sizes (they don't have to be perfect), cut 3-5 to make a nice flower shape, Fold part of the circle inward to make the circle turn into a cone shape (you can fold in as little or as much as you want depending on how you want the flower to look), glue the folds in place, once you've made the circles into cones layer from largest to small and glue in place.

Last is the 4-fold- Fold a square piece of paper in half and fold that in half again, on folded sides cut two half petal shapes, unfold.  You can repeat and layer on an additional 4-fold or leave on it's own.

After I finished making a good-lookin' gang of paper florals, I prepped the frames by removing the glass fronts.  Then I took some faux linen fabric and wrapped it on the frame backing with tape (yes it looks icky but I didn't want to use anything permanent). 
Once the fabric was set on the frames it was time to add the flowers! 

I laid them on the frames to plan out an arrangement, then all I did to attach them was pin them onto the fabric.  In an effort to not smash the paper, I carefully pinned through the flower first so all I had to do was push the pin into the fabric. 
That attachment technique seemed to work nicely (progress image above).


To bring some spring into our Living Room, I decided to add the two finished Paper Floral Frames to our mantel.  Since it's technically still winter, I left the birch branches but I added a bit of green moss in for an early fresh spring feel.

I think the Framed Paper Florals turned out to be a good winter/spring transition look for our mantel decor- certainly a unique decor addition as well! 

What do you think of this little DIY project?  Are you Head Over Heels?
What other creations would you make with paper flowers?
I have to say, making all those little flowers was kind of fun but a little annoying at first.  Took a bit to get the hang of it but thankfully no papercuts here :)  I might try making a wreath next in some bolder colors! 

Alex and I are cooking up ideas for our next home project, hope to share some of that news next!  Have a great weekend!

Tuesday, February 26, 2013

Awe Inspiring Paper Spring Decor

With March right around the corner (and no current house project... yet) I've been thinking a lot about freshening things up in our house with some Spring Decor. 

While searching around the internet for Spring-y ideas I found something that I'm totally inspired by- Paper!  Yes, who knew paper could look this fresh and pretty?  I love the how the cut paper and origami looks have a geometric edge to them, but in the form of florals they still look soft and spring-like.  Perhaps the best part is that it's all paper!  Makes it seem so DIY-able (at least I hope!).
Paper Flowers via in Decora Origami Rose via Bloom4ever  Mini Origami Flowers via Etsy-ppsblyss  Origami White Vase Centerpiece via Lovely Bride   Origami Birds via Etsy-Perpetumobile  Paper Flower Wreath via West Elm  Paper Flowers in White Porcelain via West Elm Paper Flower Centerpiece via Etsy-Balushka  Paper Flower Backdrop via Etsy-Balushka  Paper Flower Wreaths via West Elm & Etsy-DanaAndCarol  Paper Flower Wall via Ruche

With all this inspiration I'm ready to get started!  I've got paper, scissors, glue, and some craft wire ready to go, here's to hoping for no paper cuts!  Alex is excited too.... but mainly because "it sounds like this should be mostly cheap since it's paper right?!"  Maybe he'll get in on the action too?  You know, based on his strange obsession with those Paper Mache Moose Antlers, it could be a similar challenge for him :)

What Spring Decor do you feel inspired by lately?

Have you done some Spring decorating already?  What did you come up with?!?

Come on, show & tell!!!  I'd love to see what everyone is decorating their house with for Spring!

Friday, February 22, 2013

Head Over Heels DIY Friday: From DIY Caulk Lines- From Crud to Kitchen & Bath Glory

Hey everyone, it's Mr. H&HH here with a simple yet oh so essential DIY tip.  I decided to take over this DIY Friday since Carla left out an oh-so-simple and essential DIY tip from our faucet replacement yesterday...

How many of us have tackled a kitchen or bath project only to be disappointed with the caulk lines that result from those trusty orange “dripless” caulk guns? I know I have! So embarrassingly, I would try to keep everyone from seeing the lines or would hope to distract them with a subtle “HEY, LOOK OVER HERE!!”. Well, I will be filled with the shame of a bad (lumpy, pot holed, uneven, etc…) caulk line no more!

While researching install tips for our butcher’s block countertops, I stumbled across a tip on an IKEA fans forum that suggested the use of painters tape to prevent getting any epoxy or wood glue where you don’t want it. It seemed too simple. It seemed impossible. Could this technique be applied elsewhere? I knew I had to try.

Using a razor blade/utility knife I began to strip away the shame and regret from my bathroom sink.

Now, with the old caulk removed and the battle lines clearly defined in my favorite blue tape, I was ready to spread the caulk! I held my breath as I pulled the trigger on my orange weapon of choice. No matter how hard I tried, I still couldn’t keep an even, straight line. But it shouldn’t matter right? I had my magical blue friend ready to take care of me.

The next thing to do was wet my finger (spit worked fine and it drove the ladies wild, ha) and smooth out the caulk line in one smooth sweep…
Now, the moment of truth – Removing the painters tape. This is important to do when the caulk is still wet or you’ll have a whole new set of problems.

Ta-Dahhhh! Perfect, even smooth lines. Heck, I might even be sure to point them out to visitors now :-)

Oh before I go, Carla said I had to add this thing to the DIY Friday post...

Hope you enjoyed that DIY tip!  Happy Friday!