Friday, February 18, 2011

DIY Project: Vintage Inspired Crates!

I am really excited about this DIY post!  If you have checked out our blog before, it is very obvious that I am obsessed with 2 things: Chalkboards (here and here) and Antique Crates.  Turns out it is really hard and expensive to find 6 antique crates of around the same size for our Spare Room project.  So, I decided to make my own Vintage Inspired Crates!  Here is a look at the first little beauty I made yesterday!
This idea started when we failed miserably at making shelves in my new closet space.  I ended up finding a new idea after I found some beautiful inspiration that I wrote a post about here.  
 
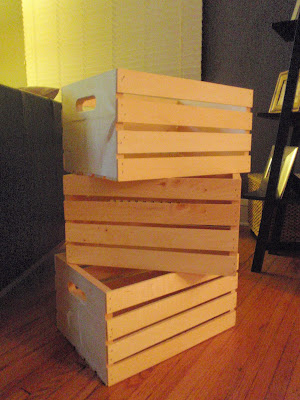
 I ordered these crates from JoAnne's, they were only $9.99 each and measure 18"Lx12"Wx9.5"H.  I was so excited when I got them in the mail!  I ordered 6 total, here are 3 of them.
Just because I have to, here is a gratuitous Rocco photo in one of the crates- you know, to illustrate the size :)
I love the structure of these crates, but the plain unfinished look is NOT what I am going for. So we are going to take these plain crafty looking crates.....
and make them look something like this!

So Let's Get Started on the DIY Steps!
 The first step was staining the wood so they would have more of an antique look (because fresh from the craft store doesn't look very chic).  I used Minwax Wood Finish in Special Walnut 224.  I looked at a swatch of it at Home Depot and thought that the color had a gray-ish antique shade to it AND it was only $6.69. 
I used a lambswool brush to apply the stain in nice even strokes
I really liked the way the stain enhanced the wood grain detail, and made it appear more aged and unique.
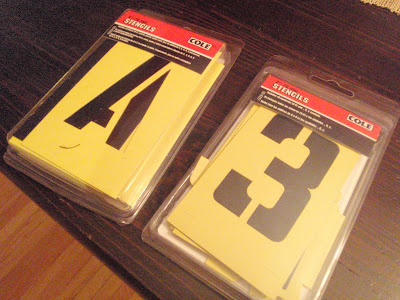
After the stain dries, it is time to add your own letters/ numbers to the crates for a more personal vintage look (similar idea to what was in my inspiration photos).  I got these stencil packs at Home Depot for $1.99 each, a total steal and very industrial looking- perfect!
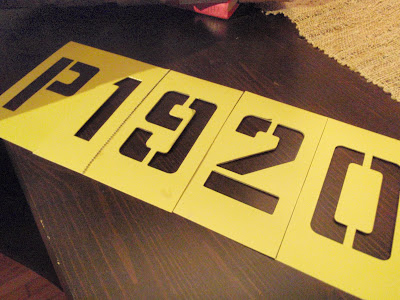
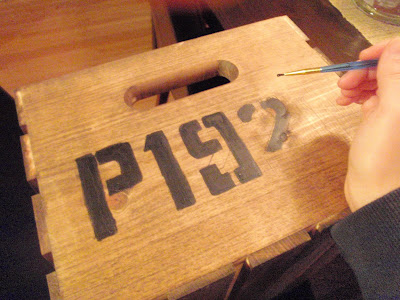
I wanted to use letters/ numbers that mean something to me (because I am a sucker for sentimental art and decor).  For the first crate I used "P1920".  The letter "P" stands for my grandma and grandpa's last name, Pierson.  The "1920" is the year both of them were born.  So, there's the special meaning!
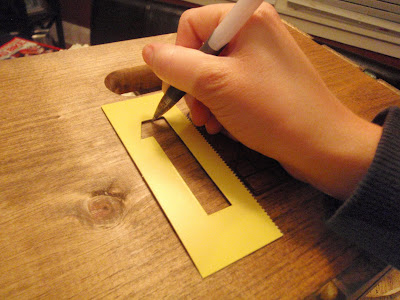
I measured out where I wanted the letters/numbers to line up, then used a pencil to outline the stencils.
Next, I painted inside each number.
A tip for anyone that tries this, use a small tip brush. I started with something larger and it was very hard to make neat lines. So I switched to a small brush.

Once you're done letting it dry you'll end up with something like this!  Totally cute!

I grabbed a couple of my actual vintage crates to compare the look (old vs. new)
I totally think my creation passes for a vintage look! I couldn't be happier with the end result.
 Now, I just need to 'antique' 5 more, crazy I know!  But I think they are going to look great once I put all 6 together to create a shelving space.  I plan to use a different sentimental number/ letter combinations on each crate, but they'll maintain the same uniform look and placement.  I will definitely write another post with the photos of them all together once they are finished.  I hope someone out there tries this out and makes their own DIY Vintage Crates, it was really fun!


Wednesday, February 16, 2011

The Great Spare Room Divide: Hanging An Antique Window

So last week we talked about our plan for this old original window from our house.

We thought it would be a perfect way to incorporate something original to the house and divide up the long crazy space in our Spare Room. 
(If you need some background on this project check out this post for the plan or this link to check out all the Spare Room posts).

In the last post Alex caulked around the glass panes and used Frosted Glass spray paint on the glass so it was no longer transparent.  He then screwed in some eye bolts to the top of the window.
The window was going to hang from the ceiling in the room. So we wanted to use something very safe and secure so that we wouldn't hear the window crashing to the floor and breaking. Alex picked out Cobra Driller Toggles which are "self drilling anchors that feature a unique and powerful toggling mechanism thereby providing maximum holding power for all your installation needs" aka some really tough anchors!
After he got the anchors in place, the rest was pretty easy. 
Just had to cut the chains to the appropriate length and hang the window in place.
Success!
So here is a nice little preview photo (sorry it is dim) of what we have going on in the never ending Spare Room Project.  You can see I am working on the garment rack and vintage styled shoe storage, slowly I am making progress! 
I hope tomorrow to post my update on the Garment rack, it turned out just perfect, I can't wait to share!

Monday, February 14, 2011

A Valentine For Our Home XOXO

Happy Valentine's Day! I love Valentine's, I think it is a fun day where you can remind the special people in your life that you care about them. It got me to thinking about our house, it is not a person, but it is certainly something we love and take care of.
So for Valentine's Day I decided to write a Valentine to our house. Who knows, maybe I will have to hand write it up and hide it somewhere in the house for a future owner to find.

I have included images of the beautiful flowers Alex surprised me with and the Valentine's decor we have in our dining room. But the rest of this post is the Valentine to our home. 
Hope everyone is spending their day with someone special, cheers!


***To my dearest little Dutch Colonial***


 We have certainly been through a lot in the past couple of years...


When we first laid eyes on you, you didn't look like you were loved or cared for.  It broke our hearts to see such a beautiful old home that looked so empty and unloved...


Over the past 2 years, we have spent a lot of time with you.  Countless hours spent sanding, refinishing, installing, decorating, demolishing, tiling, cleaning, cooking, and celebrating holidays with you.
It's funny, when it comes to people the more work you put into a relationship, the more you get back. We have learned the same is true with you.  With all the hardwork (love) we have put in, we have gotten back so much more from you...
 You make me feel safe, loved, comfortable and proud.  These walls have been the backdrop to many memories my husband and I will cherish forever. There is no other place we can say was our first home, or any other place that we have shaped, changed and made beautiful again...
But most of all, I love the feeling of knowing that when I am home in your warmth, it is where I belong.
Happy Valentine's Day my little Dutch Colonial, xoxo Love Carla and Alex.

Sunday, February 13, 2011

A Bit of Freshening Up in the Living Room

Well, here's to hoping that the 3rd time is the charm when it comes to rugs in our living room.  We haven't had the best luck in the past with rugs (I blame our 2 rambunctious pups).  A couple weeks ago we started noticing that our 2nd rug wasn't looking so hot, and there seemed to be no amount of cleaning that could help it very much.  Sadie then sealed the deal when she got overly excited and piddled all over it.  So, I was on a hunt for rug #3.  At this point I just thought, I need something simple, durable, and lower in cost (in case I was going to throw it away in less than a year). So, I hit up Ikea and picked up the 5'5" x 7'7" Egeby rug for $79.99.  Here is how the living room is looking with it now.
In case you are wondering, this was what the living room looked like with rug #1
Here was rug #2
I'm really happy with the new rug, seems pretty sturdy and I love the natural woven look.
Here is a closer look at the texture and light linen binding around the edges.
Since I was taking pictures in the living room I thought I'd also show this guy again.  I got a lot of awesome comments in the post I wrote about this vintage Military Crate I found in an antique shop.  I even heard from a gal living in Kaiserslautern, Germany with her husband that is in the Air Force.  He said it might be a foot locker that soldiers would store their belongings in before being deployed.  I also got a comment tying in Magnolia, MN!  Isn't the blog community amazing!?!?!
Anyway for now we haven't decided on adding the legs or not, but I put a stack of vintage books on top and I think it is looking very nice in that corner of our living room.
Still not sure what I will store inside, but I am sure I will think of something! Time to go help Alex hang that window, we totally procrastinated this weekend :(

Thursday, February 10, 2011

Antique Store Find: Military Crate From Germany With Mysterious Past

I went out to Antiquified Antiques in NE Minneapolis a few days ago on a whim just to see if I could find anything fun to bring home.  As I was looking at some cute vintage books, something underneath them caught my eye.  I love anything with letters or numbers on it, and what lied under all those books was covered with writing!  Once I removed everything on top of this trunk I started reading the writing. "Military", "APO", "US Army", etc.  Clearly this was some kind of army crate.
I was so intrigued!  I kept wondering what the story was with this crate.  I bought it for $32 and couldn't wait to get it home so I could start googling all the writing on the crate in hopes of figuring out it's past.
 Aside from the writing and history this crate clearly has, I also loved the worn appearance, the metal latch, solid wood, and chippy paint.  Once I got home I started googling.  I started with 'US Army' and 'Kaiserslautern'.
 I found out a lot about Kaiserslautern, Germany. Located about 300 miles NE of Paris France, nearly 60% of the city had been bombed and destroyed during WWII.  After the War, in the years from 1950 to 1955, Kaiserslautern developed into the largest US military community outside the United States.  Due to the heavy military population, the entire city began to rebuild in the late 1960's.  Currently, the army base still functions and is populated by 40,000 service men and women.

Now, I searched the name 'Barbara Standish' and 'Magnolia Minnesota' to see if I could find out any other information or maybe a lead about how old the crate might be.  Sadly no luck, all I learned was that Magnolia, Minnesota is a very, very small town in the Southwest corner of Minnesota near the Iowa border.
So, maybe the crate is from the 1950's?  The materials and costruction certainly don't appear to be from any later than that.  Nevertheless, it was fun learning about the place it came from!  If anyone else out there has any other information about this trunk or the Army Base in Kaiserslautern please let us know!

One fun little project we might do with this trunk is something that junkin' genius Amber sent us from Design Mom. They added legs to their 'Ammo Crate' so it was a bit more useful.  We are tryingto figure out where/ how we want to use the trunk, but like the idea of making it taller. 
What do you think?  Any other fun ideas for this well worn Army trunk?  Let us know!
It's almost Friday, I can't wait for this weekend... the main event, Alex + Antique Window vs. Gravity! Oooo I can't wait to see what it looks like!  Hope everyone has a great weekend!

* Update! I got a comment from a gal living in Kaiserslautern with her husband who is in the Air Force, how crazy to be so connected in the blog world?!?!  Thanks for sharing with me Ali!*

Tuesday, February 8, 2011

A New Look Through An Old Window

I mentioned towards the end of my Super Spray Paint Sunday post that we had something fun planned for another antique window (see the chalkboard we made with another here).  Back when we landed on a plan for the room, we knew we had to come up with a way to divide the space.  One side would be my dressing room/ closet and the other a sitting room (for a complete run down on this never ending room project check this link).  Originally Alex planned on building in a shelving unit to split the space, but we think we have a MUCH better idea now thanks to our good friend Amber

She asked if we had anymore of the original windows to our house in the basement and I said we had plenty.  She suggested we divide up the space by hanging one of those windows...Brillant!!! We love repurposing anything that's original to the house so we can give it new life and enjoy it everyday (just like that chalkboard).  Here's a look at some of our inspiration and the first DIY steps!

This inspiration photo is one from our own blog!  I remembered I had first seen a hanging antique window at Bachman's Idea House in December. It was hung to divide the stairwell and landing.

I found this one on The Stories of A2Z. I love the washed out wood on the frame.
This one is a little on the crazy side, but I thought the image was so cool!  This was on Curbly , you can make a whole wall out of vintage windows!
Ready, set, DIY! When we got one of the windows out of the basement, we noticed that the glue like substance on the inside of the glass panes was worn, and cracking pretty badly. Some of the panes were even loose and rattly.  We decided that it would be best to cut out the old concrete like glue and use caulk to make sure the glass panes were secure.  Here Alex is using a razor blade to remove that weird brittle glue.
Once that mess was complete Alex caulked all edges of the glass panes (sorry I don't have a picture- we ran out of space for photos!  No worries though, we bought some more space and should be back in business tomorrow).  Then, I used my trusty blue painters tape to prep for painting.
What are we painting exactly?  The glass!  Since this is going to hang and divide the space, we wanted to make sure it wasn't transparent.  For this we picked up Rust-Oleum's Frosted Glass spray paint (about $4 a can at the ol' HD). Side note: I still have to share a little bit of my Valentine's decor, I totally forgot!
 Alex had some real skills with this paint.  If I had done it, it would be a stripe-y streaky mess!  He did a great job using a continuous back and forth motion to make sure it was coating evenly and didn't look like total junk.  As of now this baby is drying in the basement!
Our goal is to get this repurposed piece of 1924 hung this weekend if not sooner.  I anticipate the event will be filled with lots of adult language (courtesy of Alex) since any 'Alex vs Gravity' project usually requires a dash of this special ingredient.  Wish us luck!

PS- I found out my crates shipped yesterday!  I hope I get them soon, super excited!