Friday, September 30, 2011

Head Over Heels Friday: Budget Friendly Fall Fashion Finds!

As much as I have been excited about fall decor (shown here, here, and here), I have been equally excited about the transition to fall fashion!  But just like with home decor, I also find my self doing a little searching for (fashion) inspiration when the seasons change.  With that, the same feeling applies when I find something awesome at a bargain price... Score! Ahhh, the thrill of the hunt!

I am pumped to share my budget friendly fall fashion finds!  I found a fun mix of fall basics and fun trendy items with prices that won't make you feel guilty to click "add to bag" (or if you are like me and your hubby asks how much something cost, you can proudly tell him the truth! HA!).
I'm totally Head Over Heels...
1. Mossimo Rouched Sweater Dress: Target $29.99  2. Deer Shadow Necklace: Forever 21 $3.80   3. Kenneth Cole Double Layer Pendant Necklace: Piperlime $38.00  4. Lace Up Wedges: Restricted $68.00  5. Dual Knit and Leather Glove Set: H&M $34.99  6. Wild Horse Scarf: Forever 21 $8.80  7. Camel Knit Blazer: Forever 21 $27.80  8. Pumpkin Spice Dress: Francesca's $44.00  9. Xhilaration Knee High Socks: Target $3.00/pair  10. Elbow Patch Blazer: H&M $49.95  11. Mossimo Supply Co. Denim Top: Target $22.99  12.Olive Faux Leather Bag: H&M $39.99  13. Riding Boots: Old Navy $44.94  14. Tribal Knit Mini: Love Culture $10.90  15. Open Blazer with Belt: Forever 21 $29.99

I'm totally not kidding about loving some of these, I already have #'s 4, 8, 9, 11, 13, 14.  The Pumpkin Spice Dress (#8) looks great with a pair of boots, and everytime I wear those Riding Boots (#13) I get a compliment. Most people are shocked that they are from Old Navy, such a good deal (but I do wonder how long they will last?).  The remaining ones I hope to snatch up soon! How fun are those necklaces? Or the goofy wild horses scarf? I'm really dying to get those vintage-y looking dual leather/ knit gloves! Oh, and a blazer with the elbow patches (or I should just make that huh?).
Did you find one thing you are Head Over Heels for too?

Do you have a fun fall fashion find to share?

I've got a lot of posts coming! It has been pretty busy around here and I can't wait to share it all!
Have a great weekend everyone!
**********

PS- I've linked this post up over at lovely Sarah's Fall linky party at Modern Country Style, stop by and get inspired for fall!

Thursday, September 29, 2011

My Bewitching Halloween Door Decor

I must admit, I'm sort of bewitched with my fun little Halloween themed door decor!  Take a look at my DIY chalkboard witch hat creation hanging from my new favorite thing- a vintage numbered clothes hanger from Bachman's (branded Creative Co-Op).
This was sooooo easy to make! I used burlap, chalkboard spray paint, and a numbered button I already had (how nice is it that I happened to have a 31, which is the date for Halloween?!).

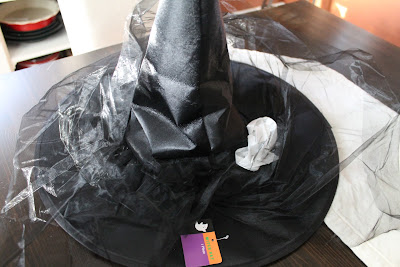
 The only thing I purchased was this witch hat from Target. It was only $2.50 up front in their See Spot Save section- who doesn't love that little dollar store section?!?
 I ripped off the black tulle and small rosettes.  Just needed the bare bones witch hat.

Here is the strip/ ribbon of burlap I used and the number 31 button. 

We had a can of Rust-oleum's chalkboard paint in the basement.  I grabbed it and spray painted the flat rim part of the witch hat.
 I wish I had taken pictures of it, but to be honest, I didn't know if chalkboard paint would work on fabric.  Well....

It did!!!  Once the chalkboard paint dried, chalk adhered to the hat just fine.

I pinned the burlap ribbon around the top of the hat, then pinned on the #31 button.

I just love how each detail turned out!

Here is a closer look at just the vintage styled clothes hanger.  It is rustic, has a number plate, and three clips. I can't wait to brainstorm other decorating ideas for this hanger for Christmas!

I think the witch hat is a fun alternative to a wreath or a sign. Love how it turned out!

So... chalkboard paint on fabric, check- it can work!  Cheap hat from Target's dollar section, it can be something more!

It's always fun learning as you go with decor, right?!? Are you liking the chalkboard witch hat?

More fun fall posts to come!!! Gosh, I love fall, there are so many fun ways to decorate!  Does anyone else feel like fall brings new, fun and inspiring ideas for home decor?

It's party time!  Linky party it up with us at Southern Hospitality's Fall Door Decor party!


The DIY Show Off

Tuesday, September 27, 2011

Gather 'Round Our Fall Fireplace Mantel

I just finished up doing a little fall themed decorating on our fireplace mantel.   It feels nice to have that cozy fall feeling in our house! So, what do you think?
 I think it is simple and turned out pretty nice.  I also didn't really have to buy much to decorate it (which was a bonus)!  I used the antlers and Z stencil I picked up at Junk Bonanza and then picked up a couple items on the cheap at Goodwill.  Other than that, I used a lot of what we had in the basement and made a couple things myself!
Here's a few closer looks at the decor... 

At the base of the fireplace, I put some of our birch firewood in a wicker basket and then added some faux fall colored leaves.

On the other side I have some more of the colorful faux leaves with a real pumpkin and a Smith and Hawken pumpkin I got from Target last year.  I am thinking the number of pumpkins will soon multiply though as we get closer to Halloween.

Up top, I have a candle holder I got at Goodwill for only $5.00!  It fits perfectly under our TV which is nice because that always seems to be a challenge when I am decorating the mantel.  I made the "Gather" banner with old book pages and a stencil, it was really simple!

On the left side I have two more little DIY projects- the framed leaf and the torn and stacked old books wrapped in twine.  Both projects were super simple and low cost! I had all the materials at home for the framed leaf and I spent $1.49 for 10 books at Goodwill in their bargain bin (knowing I was going to tear them up anyway). Other than that, I have a candle in a vintage light bulb holder and I got to use my antlers!!! Yes!

On the right I have another stack of torn books wrapped in twine along with my Z stencil, antlers, my A bookend and a candle wrapped with some twine.

Here's one last look.

I hope you enjoyed a peek at our mantel!  I think I might write up a quick post on those little projects I completed for the mantel, they were pretty easy and hardly cost any money!  So I think I have to share!

Well, I'm off to Layla's Linky Party at the Lettered Cottage now. I think I am already late to the party, but I can't miss it!  You should stop by too!
The Lettered Cottage

Sunday, September 25, 2011

Bachman's Fall Idea House: A Transition of Seasons and Styles

Well, if I didn't have enough fall decor inspiration before, I have a TON now!!!  It's time Bachman's Fall Idea House!  Get ready for an overload of inspiring ideas!

I have covered their Spring, Summer and Holiday Idea Houses before (click the links on each season to see those posts).  This is my first time seeing what their Fall version held and it certainly didn't disappoint.  Here's some info about Bachman's Idea House (from my Holiday post):

Bachman's is a Floral and Gift Garden here in Minneapolis. Their Idea House was their original founder's house built in the 1920's (very similar layout and details as our house!). The company now uses the house for their seasonal Idea House creating entirely new rooms for each of the four seasons. Everything about each room is different for each season's idea house, right down to the paint on the walls. When you enter the house you get a brochure that lists all the details for each room including the paint color and 'ideas'. The cool part? Everything in each room is for sale!
I tried to do a sort of photo collage of each room so that this post won't be as long as the past Idea House posts (hope that helps!).  I will show the room, then list the ideas shown after each grouping of photos.

Time to get inspired! Ideas Away...
The Porch

Repainted salvaged wood dresser with hand-painted storage labels;  Four chairs turned into a storage bench;  Vintage daybed turned into a sofa, Industrial cart repurposed as a coffee table;  Garden fence and test tube garland used as wall decor;  Salvaged nautical lights repurposed as table lights;  Chandelier made from glass jar candle holders

The Living Room

Table runners and salvaged metal fence pieces used as wall decor;  Glass tubes filled with flowers and hung with ribbon; Photo frames tied with wheat and ribbon; Salvaged wood and windows turned into a coffee table, filled with vintage print blocks; Vintage ironing board used as a sofa table;  Vintage trunk top and industrial base turned into a side table;  Floor lamp made from garden shepards hook and pendant light;  Vintage books used as shelves;  Oversized lanterns filled with lit Chinese lanterns and leaf stems

The Sunroom

Vintage grain cleaner transformed into a wine bar;  Whiskey barrels turned into shelves;  Print blocks used to spell out wine names;  Bottles topped with candle holders;  Corks used as cheese labels;  Wine glass charms made of buttons; Vintage butter churn used as a planter; Tree rounds used as cheese and fruit serving platter; Wine sample station using fabric wine bottle covers and chalkboard signs

The Dining Room and Kitchen

Dining Room: Salvaged wood used as a side table and wall decor; Botanical book pages hung with upholstery tacks; Chairs decorated with burlap, napkins, wheat, and silks; Vintage glasses and candle holders; Fall harvest ceramic candles used as place cards; Wine bottles used for curtain finials
Kitchen: Garden hoes fashioned into shelves; Vintage postal sorter used as organizer; Wallpaper made from cookbook pages; Vintage shutter used as recipe cardholder; Mason jars with painted chalkboard labels

Bathrooms (Lower and Upper)
Salvaged vintage buffet tops used as mirrors and shelves; Yardsticks turned into ledges; Insulators repurposed as towel holders; Chair backs turned into shelves; Wood worker box turned into wall organizer; Shutter used as a valance

Stairwell

Wall decor made from burlap, salvaged windows, picture frames and glass drawer pulls


Boy's Bedroom

Vintage scooters as shelves; Salvaged, repainted dresser with flash card and building block accents; Metal pail organizers with license plate letters; Store checkout light turned into floor lamp; Headboard created with tin number wall art; Soda crates hung on wall as shelves; Toy truck used as a planter

Girl's Bedroom
Vintage picture frames turned into shadow boxes; Freestanding mirror turned into organizer with earrings used as tacks; Magazine wall mural; Old armoire upholstered with fabric; Salvaged metal building trim used as curtain rod; Painted glove molds (hands) used as jewelry holders; Dress form turned into a lamp; Headboard made from salvaged decorative wood, ribbon, and fabric shower curtain


Master Bedroom

Table repurposed as headboard; Fence gate, wood plinth and metal letter as wall decor; Salvaged scrap wood turned into armoire; Salvaged ceiling tin turned into mirror; Trunks as table and suitcase wall decor


Office/ Media Room

Poultry crate repurposed as coffee table; Herb drying racks used as newspaper holders; Bike wheels turned into cardholders; Roof vents used as lights; Worktable made from wooden beehives; Salvaged schoolhouse chalkboards mounted on wall; Tractor seat turned into stool; Picture frames used to spell out "news" and newspaper


Attached Garage
(Fall Harvest Party)
Bench seats made from straw bales and braided rugs; Salvaged wheel and tabletop turned into a table; Cork coasters turned into beverage labels; Vintage colanders lined with leaves and used as bowls; Utensil holders made from burlap covered candle holders; Vintage buckets used as planters; Breadboards decorated with Indian corn; Wall decor made from colored burlap, napkins, clothespins and clothesline; Braided rugs used as placemats


Shed
(Haunted House)
Vintage Christmas tree stands with ornamental branches and fake crows mounted to the roof; Table made from a casket cart and glass door; Glove molds (hands) used as mummy hands; Colored water in glass bottles labeled with sinister potion names; Lighted branches potted up as a tree; Spooky refrigerator magnets used as wine charms; Containers filled with creepy fruits and veggies

Phew! 
Amazing right?  I'd have to say, my favorites were the Office/ Media Room (love that worktable and paint color of the room- Hirshfield's 0574 Shark Fin) and the wine/ cheese tasting themed Sunroom.

What were your favorite ideas???

I hope you enjoyed a look at Bachman's Fall Idea House.  I know I have a few DIY projects in mind after my visit!  I've got a lot of the fall decor finished up in our house, hope to share later this week!

************************
PLEASE NOTE: In case you didn't read the top of the post, I just want to reiterate that this IS NOT OUR HOUSE and I am not employed or affiliated with Bachman's in any way (which means I did not decorate the rooms shown). I am a HUGE fan of the Ideas House and love sharing it as long as they allow people take photographs when they visit. It seems some people have been confused about that and I would NEVER want to take credit for something I did not work on. There, I feel better now :)
Hope you found some inspiration, thanks for stopping by!

Friday, September 23, 2011

Head Over Heels Friday: Autumn Inspiration


Fall is officially here! 
I realized it is time to get my rear in gear and get my house decorated for the season.  Last year was the first time I got into decorating the house for fall (those posts here and here). It was pretty minimal, but I loved it!  It made our home feel so warm and cozy inside.  I can't wait to get our house decorated once again!  To get me in the fall spirit I put together some of the decorating ideas that I am Head Over Heels for.  Bring on the colored leaves, corn husks, lanterns, hardy mums, pumpkins, and pumpkin candles!!! I'm so ready for everything fall!

Before I head out shopping, I'm thinking I should dig through the basement and find some of the items I used last fall. Hopefully I can save some money and find new ways to use what we already have. I definitely plan on decorating the sideboard in our dining room, the fireplace (and mantel), our front door/ porch, and of course the dining room table with a fall themed centerpiece.


Are you Head Over Heels for fall decor as well?

What is your favorite part about fall decor?

If you have other ideas or suggestions for places/ rooms that you decorate in your house (in addition to the ones I listed above) I'd love to know!  I'm always looking for new spots in our house to cram in some seasonal decor!

Have a great weekend everybody!

Wednesday, September 21, 2011

Then, Now, and What's Next: The Guest Room and Office Edition

We are (hopefully) getting closer to starting interior repairs on our house!  All of the interior damage caused by the May Tornado is in the upstairs of our house (see list of damages in this post). The rooms that will be having work done are the Guest Room, Office, Master Bedroom, and the Hallway/ Stairwell. 

The biggest repair will be closing up the hole in the ceiling in the Guest Room where the tree came in through the roof.  Other than that there is a lot of surface repair that needs to be done because of water damage.  The bonus with that is we have the option to change any of the current paint colors in those rooms.  We are still debating some of the color changes, so I thought it would be nice to look back at those rooms and share our design ideas. 

I wanted to cover all of them in one post, but it was starting to get really long.  So today I will review the Guest Room and Office leaving the Master Bedroom and Hallway for a separate post. Also,  if you have an answer to some of the questions in bold please send us a comment!

The Guest Room
As I have said before, the Guest Room was my favorite room in our house since we had the fun opportunity to work on it with Layla and Kevin from the Lettered Cottage.  But way before that, this was what it looked like when we moved in...
Loved it!  But then in May, this happened :(
So now the room sits like this today
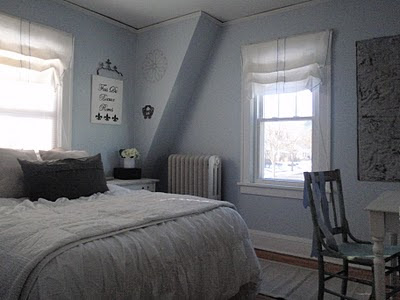
Our contractor told us the hole will be fixed (obviously) and that the walls all needed to be repainted due to water damage.  I thought it was neat that we had the option to change the room color, but Alex and I are both on the fence about it.  I guess if we did change it I feel that I would keep it a light blue, but maybe dustier so it isn't so light and bright feeling?  Kind of like this room?
I know the colors are quite similar, and I still like Cumberland Fog, but if we have to paint it anyway it might be nice to change it up.....even just a little?

What do YOU think?  

Should we leave it Behr's Cumberland Fog or change it to a dustier blue?  

Do you have the name/ brand of a dusty blue paint color you can recommend? 

The Office
Our office hasn't yet made an appearance on our blog, so here is it's big debut!  It is pretty much a mirror image of the Guest Room, but a little bit smaller (the two rooms share the wall on the left side in this photo).
Just like our Guest Room, we found out that our little office is also eligible for a new paint job since the walls had water damage.  Here's a look at what the office looked like when we moved in (sorry for the mess!).  Note the carpeting and curtain instead of a closet door.
We did a little work on it, removing the carpet, adding a closet door and repainting the walls.  This is how it is looking today.  (The bed is in there because we had to move it out of the guest room when they removed the attic insulation)
(I guess it is an example of the whole upstairs being an unorganized mess, can't wait to get my home back in order!)

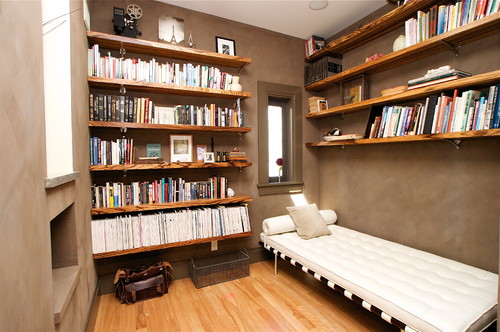
Alex and I both agreed that we weren't loving the color we chose.  The gray was too dark in that small room and it looked sort of purple to us.  I found this picture on Houzz and the shape reminded me of our office and it looked so nice!  I'm really digging the grayish/ brown color, the shelves, and the touch of black and white stripes.  Alex loved it too!  I think the walls in this photo have some sort of finish or texture to it, but I think we will just do plain ol' solid colored paint.
Library modern family room
We are pretty sure this is the direction we will be going with for the Office but of course with a desk and chair that have a vintage/ industrial flare in place of that couch.
Are you liking our Office inspiration too? 
Do you have any paint brand/color suggestion that look similar to this shade?

*************
That wraps up our ideas for the Guest Room and Office.  The Master Bedroom will be next! I'd love to hear what you think of our ideas or even if you have a better one for us! 
Please sound off in the comments :)
Alright, now time to relax! Who's excited for the one hour premiere of Modern Family on ABC?!? This girl!!!

Monday, September 19, 2011

Sew Easy DIY Multi-Wear Snap Scarf

I have a super easy DIY project to share that any gal would LOVE!  This is a scarf made out of jersey knit fabric with metal snaps so you can wear it several different ways!  It is perfect for fall! 
You're intrigued right?!?!?

I stumbled upon this idea while looking for a birthday gift for my lovely sister-in-law Amber.  Amber is a self proclaimed 'Yoga Geek' that teaches at the Funky Buddha Yoga Hothouse in Grand Rapids, Michigan (she also blogs about yoga here!).  I was on Lululemon's website and found a Vinyasa Scarf.  It has since been removed from their website (must have been a HOT seller), but here is what it looked like...
  It is a jersey knit scarf with snap buttons along each end, I am not sure what makes it a 'Vinyasa Scarf' but that was it's name.  I thought Amber would love it and I could make one pretty easily (with my own twist on it of course)!  I also thought I'd even like to wear one just for everyday, super cute and I love accessories you can wear multiple ways!

So, let's get started on the tutorial!

You will need: Jersey knit fabric (mine was only $6.99 at JoAnne's), sewing machine, thread, scissors, pins, iron, hammer, measuring tape and 12 snap fasteners (with kit if you don't already have one).

Any jersey knit fabric should work just fine, you can 1.5 yards at JoAnne's Fabric for only $6.99, DEAL!  The piece of fabric I had measured 50"W X 54"L  and then folded in half (in what will be the finished size) to 25"W x 54"L.  With the wrong side out, sew along the length and one end of the width (shown in the white dashed line below).
Once you sew those 2 lines, flip it right side out. 

Then press the seams you just sewed so they are nice, neat, and flat.

Now, you are left with one end that has unfinished edges. (Make sure your other seams are now inside of the scarf).  On this end, you are going to press those unfinished edges in 0.5".

Here is a look at those edges now pressed and folded towards the inside of the scarf.

Once you pin those edges together, you are ready to sew them down into place.

Here is what that end of the scarf will look like.  It is the only part of the scarf where a stitch seam is visible.

 Now, we are done with all the sewing, yay! Time to add the snaps, here are the snap fasteners I picked up at JoAnne's.  They are the 16.875" size, and I had to get the kit since I didn't have that little hammer tool you need.

Measure where you want them placed depending on how many snaps you want.  I did 11 snaps along the side, so they were spaced about 2.375" apart. 

Then grab your fastener tool and hammer those snaps into place. Don't be shy!  Use some FORCE to hammer those babies in place so that they won't come loose when you are snapping/ un-snapping when you wear it.

It is a bit tedious, but super easy to do.  Here are our snaps on each end!

I ended up adding 2 more snaps placed mid way down the scarf (across from the middle (6th) snap) and almost a third of the way in on each end, which measured 17.0".  Here is a little diagram:

The Lululemon version didn't have these extra 2 snaps, it was my BRIGHT idea!  This allows for more ways to wear this scarf!

THAT'S IT! You are done, super easy right?!?! Now to the fun part, let's see how many ways you can wear it...

Here are my favorite ways to wear it!

I counted 11 different ways, but hey, there might be more? Okay, now I need to mail this to my sister-in-law (thanks for letting me show it off on the blog first!).

Happy (late) birthday Amber!  I hope you love this scarf and I hope it comes in handy for your yoga classes (and for super cute everyday wear)! 

Now, time to make another one for me!

I've linked this project up over at Centsational Girl's Fall Craft Party!!!  Stop by!