
Does anyone else have a not-so-perfect looking window screen at home that is in need of repair or replacement? I know we do but what I didn't know until yesterday was how easy it is to fix DIY style thanks to my friend/carpooler extraordinaire Dean!
You might remember Dean from my antiquing/speeding ticket post but we've been co-workers, friends, neighbors, and uber fans of The Golden Girls and the movie Overboard for quiet sometime now. Anyway, when I heard that he was going to replace some screens after work I said, "Tell me more Dean!" and politelybegged asked if I could come over and see how it's done. Thankfully Dean said okay and I have the DIY steps to share with you today (thanks Dean)!
The materials you need are replacement screening and vinyl retainer (size depends on your window or door) but most home improvement stores carry kits that include vinyl retainer and a handy installation tool! Dean picked this one up for just $10.97.
 In order to remove the screen frame, Dean began by taking down his storm window to access it (note, beginning steps will be different depending on the type of window or door you have the screen in).
 Once you have the framed screen out, remove the old vinyl retainer and take the old screen out.
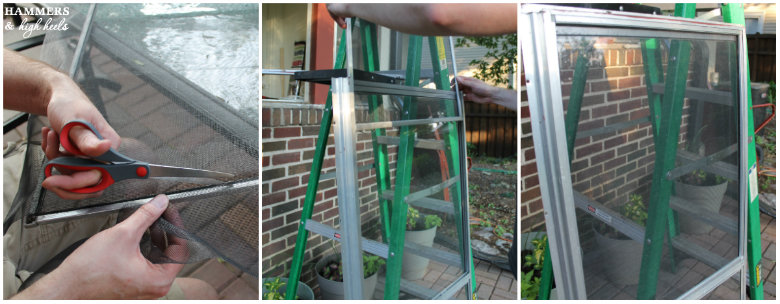
 Then lay the screen frame down with the retainer groove side faced up, place the new replacement screen over the frame with at least 1/2" of the screen extending beyond the retainer groove on all sides (Dean left more than the 1/2" recommendation and trimmed the excess with scissors afterward which also seemed to work just fine).
The next step was to add the vinyl retainer into the groove using the bevel or concave edge wheel on the installation tool. Starting in a corner and working in one direction all the way around, Dean lightly pushed the vinyl retaining into the groove.


How about you?
Did you know screen replacement was that easy?
Are you going to replace any window or door screens with a screen repair kit too?
PS- I've been trying to get Dean to do the Golden Girls with me for Halloween for two or three years now, wouldn't we make a killer Dorothy and Sophia?!?! I hope this convinces him, what do you think?

You might remember Dean from my antiquing/speeding ticket post but we've been co-workers, friends, neighbors, and uber fans of The Golden Girls and the movie Overboard for quiet sometime now. Anyway, when I heard that he was going to replace some screens after work I said, "Tell me more Dean!" and politely
The materials you need are replacement screening and vinyl retainer (size depends on your window or door) but most home improvement stores carry kits that include vinyl retainer and a handy installation tool! Dean picked this one up for just $10.97.
The next step was to add the vinyl retainer into the groove using the bevel or concave edge wheel on the installation tool. Starting in a corner and working in one direction all the way around, Dean lightly pushed the vinyl retaining into the groove.
He also made sure to pull the screen slightly away from the corner he was moving towards to make sure that the screen mesh would lay straight along the groove.
After the screen was installed, Dean trimmed the excess mesh around the four sides. The, it was ready to place back into the storm window.
Not too bad right? Maybe I am a nerd for not knowing that screen replacement would be that simple, but now that I know I want to replace the screen on our back sliding door that leads to our deck. Sadly, Sadie seemed to forget that the screen door existed every time spring rolled around. The first few warm days we left the sliding glass door open she would run smack into it, poor little simple Sadie!
I'm Head Over Heels for this DIY knowing I won't have to look at that icky slider door screen anymore! Just have to hope Sadie won't have the same trouble next spring though I guess?
How about you?
Did you know screen replacement was that easy?
Are you going to replace any window or door screens with a screen repair kit too?
PS- I've been trying to get Dean to do the Golden Girls with me for Halloween for two or three years now, wouldn't we make a killer Dorothy and Sophia?!?! I hope this convinces him, what do you think?


Okay, can I just say how much I love that you're a woman doing all your own repairs? Fantastic! I can't believe you did your own window screen repair! I tried it in Northridge CA one time and wasn't able to finish the project. It's tough!
ReplyDelete