Sunday, February 27, 2011

Easy Linen Striped Decorative Pillow How-To

I'm patting myself on the back for making this cute little pillow today!
I owe the idea to Kimberley at Resortation House, here is a photo of her version.
Last week I linked up our DIY Vintage Inspired Crate to the Lettered Cottage's How-To's Day. I found Kimberley's how-to and just couldn't get the idea out of my head!  Her how-to steps are a little more detailed than mine, but here are the steps I did to create this pillow cover.

The fabric I used is the same linen-like fabric I used for my numbered chair covers.  I started by measuring out where I wanted the stripe placed.
 I picked up Tulip's Matte Soft Fabric Paint and Foam Brushes from JoAnne's to paint the stripe on the fabric.
 It was my first time using fabric paint and it went on so easily!
 Here is a shot when I was almost done painting the stripe. I have to give a Western Michigan University shout out here since I was sporting a sweatshirt from my alma mater in the picture (GO BRONCOS!).
 Next, I hemmed the top and bottom edges of the fabric.
 Here is a look at the hemmed edge. (and I hope you can see the texture in the fabric, it's not just solid white!)
 Then I folded it up to sew the pillow sides.  Note- I did an envelope closure on the pillow, this ensures that when flipped right side out, the flap you see at the top would be folded into the closure.
 Before I show the final look, I have to show the other pillows in our living room (and why the new one is a perfect match!).
 I have numbered pillows from Pottery Barn and just love them!  They are on a heavy woven fabric with black numbers printed on one side, and the word and definition on the back.
So once I got the insert into the pillow and set the completed pillow on our armchair I was just amazed!  How perfect does it look?!?
 Makes the room and style so wonderfully!  It was so simple to create and I am so happy with my new pillow!  Thank you again Kimberley!
PS- If you are following along in our Spare Room Project, here is a sneak peek at something else we were working on today for those Vintage Inspired Crates!  Will do a post about the finished product this week!

Friday, February 25, 2011

From Architectural Salvage to Wall Decor... and Window Treatments?

Remember these fun things I picked up for just $12 at my last architectural salvage adventure? (see Part I and Part II)
(Salvaged Woodwork and Doorknob plates)

Well they are now a part of our home decor!  Here is what I did with both...

Woodwork Pieces
First, the woodwork was terribly dirty (see first photo in this post), so I had to do some scrubbing  This is what they looked like after cleaning.  Our assumption is that these pieces were removed from a house that had burned down (sad).  The majority of what I had to clean off was ash.
Next, we had to put a frame hanger on the back.
Alex nailed it in place for me.
Then up they went on the wall next to the fireplace!  I love the rustic woodwork next to the exposed brick.
We still have to find a home for the other two.  I hope to show some more overall pictures of the living room, but I am starting to feel like we REALLY need some window treatments ASAP. That is now on our to-do list. Anyway, onto the next!

Doorknob Plates

 I got this from Target a year or so ago.  It is a shadow box with linen fabric and some vintage looking keys.
It inspired me to do something similar with these doorknob plates.
I went to Target and picked up this Room Essentials Shadow Box Frame for $9.99
I had some leftover burlap fabric from JoAnne's and cut it into a square to use as the background for the shadow box.  I think you can get some of this for $3.99 a yard at their store.
Of course I didn't cut a perfectly measured square (I hate measuring, it is so terrible!), so I pinned it into place and cut off the excess fabric.
Then I arranged them on the burlap fabric
Once in place, I used large T-pins to secure them to the board.  I didn't want to glue them in or do anything that was going to permanently affix them to the burlap. I put the pins where the nails/ screws would have been used when it was on a door. (Excuse the mess!  I actually did this project before heading to work this morning, crazy!)
Finally, here it is!
We hung it up in our living room as well.
 Here is what the pair looks like together, I just love it!  A match made in heaven!
Again, I didn't include shots of where we hung these on purpose, the wall still looked empty!  We really need window treatments! 
What do you think?  We currently have nice white wooden blinds on each window now (thank goodness they aren't the really awful plastic ones).  I'm really starting to think it is time for nice curtains!  We have that big window at the end of the living room, then a window on each side of the fireplace.  What color (and remember, I fear bold colors)?  What style? Any feedback in our comments would be appreciated! 


The DIY Show Off

Wednesday, February 23, 2011

A Nice Surprise After Painting The Garment Rack

A couple weeks back I wrote a post about spray painting that Commerical Garment Rack I found at Target for the Spare Room/ Closet.  Well, I got a nice little surprise once it was done.  After it dried and we got it back upstairs, I realized it matched the metal on my vintage dressform!  Totally unintentional, but wow, it looks so much better now that they coordinate!
So here is what it looked like before spray painting.
This is the after using Rustoleum's Oil Rubbed Bronze Spray Paint. So much better without the chrome look!
Originally, I just didn't like the chrome metal, but wasn't aiming for it to match the metal on the dressform.
But now that they are matching it helps to pull together my strange strategy in this room.
So here is where we are at now.  My clothes are off the floor!  I also have to add that while moving closets, I did a major purge of unnecessary items!  I filled 4 grocery bags of things that were hanging in my old closets that I hadn't worn in almost a year and dropped them off at Goodwill.   It felt good to get more organized and have less stuff to sift through!  I'm thinking I will put a vintage sign in the space above the rack to add some decor!
Next is getting my DIY Vintage Crates in there to add some shelving for storage!

Monday, February 21, 2011

Northside Architectural Salvage Stores: Part II Guilded Salvage Antiques

Continuing on from my last post, here is part II!  Dean's second recommendation was Guilded Salvage Antiques and House Parts.  This store wasn't as huge as Bauer Brothers so it was a bit easier to cruise through.  Goodness, it was a beautiful store! Sigh....
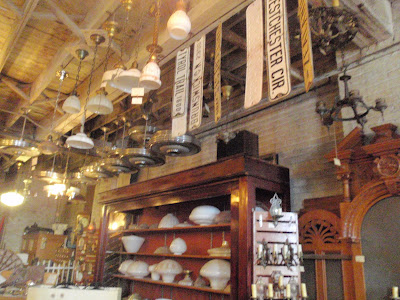
 I think this store was pretty comparable to Architectural Antiques in Northeast Minneapolis.  They had a lot of architectural antiques and merchandised them so beautifully.  It was a lovely store to cruise through on a Saturday!
 I was amazed by their table of home hardware/house jewelry.  It was so beautifully organized and really drew you in to look at each piece.
 The detail on vintage hardware amazes me, each piece is truly art.
 They had so many vintage street signs from around Minneapolis and her suburbs.
 This is a photo from the center of the store, I could have spent all day there.
 They also had a great stock of amazing salvaged doors.
 I loved all the vintage wrought iron pieces they had throughout the store.
This store was so beautiful, totally worth checking out.  I think the best part was that the staff/owners had a vast knowledge of most items in the store.  I was eyeing some cool bricks, and they were able to tell me which church state they hady come from.  Crazy!  

So here are the rest of the items I picked up on my trip!  Only $2 each!  I am hoping to make a piece of wall art with them using a shadow box.  I have some antique skeleton keys in a shadow box in our living room and I wanted to make a coordinating piece using these doorknob plates (since they have a skeleton keyhole).
I will definitely do a post about what I create with these and where we end up putting those antique woodwork pieces once they are cleaned.  Happy Monday everybody!
PS- I plan to do a couple posts about the remaining DIY antique crates and progress in the Spare Room Redo this week!

Sunday, February 20, 2011

Northside Architectural Salvage Stores: Part I Bauer Brothers Salvage

WOW. WOW.WOW! Okay, just had to say this store was amazing!  If you live in Minneapolis you have to check this place out.  But let me back up and give you the story of where I went and why....
I have written a few other posts about my antique and architectural salvage store adventures.  A friend of mine (and fellow NOMI resident!) informed me that there are a couple AMAZING architectural salvage stores right here in North Minneapolis that I had to go see.  Holy Moly!  He wasn't kidding, I am so glad I found out about these stores and I am excited to share some photos of my visit and what I bought!  HandHH shout out to Dean!  Thank you so much!

There are 2 stores I am going to write about and I had to break it into two posts so they weren't so long and confusing.  The first place (which is again, AMAZING) was Bauer Brothers Salvage. I was also excited my friend Amy joined me on this adventure, girl's day out junkin'!

This place was no joke, it was a GIANT warehouse that seemed to just keep going and going.  Just when we thought we saw it all a worker told us there were 2 more floors to explore.  We joked that we should have brought some bread crumbs to help us find our way back to the entrance!
If you do go there, be sure to scroll to the bottom for some tips about what you should do/expect if you visit this store. 
 Here are some images of what we saw there...
Hutches, cabinets, light fixtures, hardware, sinks, grates, clocks, woodwork, etc.
 A whole floor of antique windows!  If you need some, come to this place! Just about any style/ color you can think of!
 Holy windows!
 They had salvaged radiator covers too.  Alex and I might take some measurements and come back to look at these.  We have lots of radiators and it might be nice to cover a few so we can use the space above them.
 Vintage shutters!  I know I will be back to get these once we decorate our master.  I love the look of these hung up on a wall.
They had a whole outdoor space filled with larger items as well.
 Here is another item I loved when I saw it.  Vintage lockers!  This would have been great in my new closet/dressing room.  Hmmm, after looking at this picture I might have to head back for another look at this. I worry someone might get to it before me though, these are so hard to find!

 Here are 5 tips for anyone that goes to shop/ explore at this store:
1. If you have something in mind that you want, tell the workers there exactly what you are looking for.  They have just about everything, I mean EVERYTHING!  The building is so big it would take forever to look for it yourself.  Just ask.
2. If you go in winter, bundle up!  This place is so big it isn't heated, and you will likely be there for a while if you like junkin'.  We got sooooo cold!
3. Wear gloves!  Not just for the cold, but things here are brought in from their salvage site and placed right in the store.  It isn't cleaned, so your hands might looks like this after you have looked through a few things...
4. Be warned, this place isn't set up to be glamorous.  The first section you walk through is set up very nicely, but the rest is just stacks and piles of items to sort through.  What they lack in 'beautiful merchandising' they make up for with their prices.  Most items were half or a third of a price you would find at other antique or salvage stores.
5. This is probably the best one... try to Bargain!  For the items I picked up I was able to get them for less than half of where I started at.  Granted mine were pretty little, but their staff is seemed pretty fun, so if you have a good attitude you might get a good deal!

So what did I get?
I only spent $12 and got 6 things! Talk about great prices (and a bit of good bargaining on my part)! I got these 4 antique woodwork pieces for only $2 a piece.  Funny, I thought they were gray, but they were just dirty.  Once you wipe them down they look like the white one in the top left.  I think I will hang them on a wall in the living room?  I love the rustic look!
I will share the rest of what I purchased in the next post tomorrow!