Friday, March 29, 2013

Head Over Heels Friday: My Easter Chubby Bunny

In anticipation of Easter, I decided to make my own Easter Bunny!  In order to do that, I used the cutest, fluffiest critter I know....


Rocco certainly makes a cute chubby bunny right?  Lucky for him the photo session didn't last long.  This sums up what happened....

But before he got his treats, I had to capture his hopping in action...

I know, it's pretty lame but I couldn't resist!  I'm Head Over Heels for this little Easter Bunny!  Are you too?

Hope everyone has a wonderful Easter weekend!

PS- Be sure to enter the $50 Shabby Apple giftcard giveaway in case you missed it yesterday!

Thursday, March 28, 2013

Shabby Apple Giftcard Giveaway! Which Dress Belongs in Your Closet?

I've been talking a lot about my closet lately, but today let's switch gears and talk about pretty clothes...  Better yet, $50 worth of pretty clothes from Shabby Apple that can go in YOUR closet for FREE!  Yes, it's a $50 Shabby Apple giftcard giveaway!!! 

I'm a big fan of Shabby Apple, not only for their fun fashions but as a career-minded gal- I think it's inspiring that the company is woman owned, operated, and they donate to help other woman start their own businesses.  Pretty awesome message isn't it?  Their ideals are modern but their fashion has some vintage-glam flare!  I'm loving their vintage style dresses like Full Steam AheadDecadence,and Bampton.
For any moms-to-be they have some super stylish maternity dresses also!

For a chance to win a $50 Shabby Apple giftcard, all you need to do is...
     1. Visit Shabby Apple's website and let me know which dress is your favorite below in the comments
     2. "Like" Shabby Apple on Facebook

That's it!  So which dress is your favorite?  Let me know in the comments and you can win, couldn't be easier, right?!?  Shabby Apple is also graciously offering 10% off to Hammers and High Heels friends... just use the code hammersandhighheels10off at the check out.

Here's to hoping YOU win!  The winner* will be chosen at random and announced here one week from today on Thursday, April 4th.  Good luck!!!

*open to US addresses only

Monday, March 25, 2013

Thrifty Chic Finds for the Dressing Room!

I must have had luck on my side this weekend because I nabbed some major scores for my Dressing Room Project

First, I found this set of vintage gold wall shelves for $1.99!  A deal like that was too good to pass up and I thought they might add a unique and glamorous touch in my room!
Naturally, I had to google the Syroco logo I found on the back of the small wall shelves and found that it was from the Syracuse Ornamental Company (Syroco). Syroco was founded in 1890, they were best known for molded wood pulp interior decorations and novelty items that resembled hand carving.
My second find was this campaign style dresser at Goodwill for just $10.00, crazy right!?! 

I couldn't believe it when I saw it, especially since campaign style dressers have become so popular over the past year.  I see them in blogs, magazines, and catalogs in just about every color and they always look like a perfect chic decor accent (and bonus- storage!). 

Now the question is, what color do I paint mine? Goodness knows that gross faux wood finish has got to go!  I love the look of the black and I feel like that would be the smart choice, but I'm kind of drawn to the rich blue or grayish blue... hmmm?

Speaking of painting, with all of these brass and gold decor accents I had to make a change to an older thrifty chic find I had in my Dressing Room.  Yes, I decided to make those bleached wood legs gold!
I thought it would fit the room better with a metallic glam touch!  I just hope the gold starts showing up.  I knew I'd have to do multiple coats knowing the surface was just raw wood (usually soaks up LOTS of paint before showing up).  So far it's looking more like maple syrup than gold... which honestly made me want pancakes really bad.  But I'm hoping it turns out fabulous like I am imagining!

So, now I have to ask you...

What do you think of my thrifty new finds?
What color would you paint the dresser?

Aside from the gold shelves, dresser and chair, the last items on my list to bring it all together are window treatments, an accent rug (or two?), and a few decorative storage bins.  I hope once I figure out the color for the dresser I will be able to choose coordinating decorative accents!  Be sure to let me know what you think, I'd love some help!

Friday, March 22, 2013

Head Over Heels DIY Friday: Scallop Edge/Hem Skirt

Well, I've been really excited about all the cute spring trends I've been seeing lately... The sad thing is that there's still a foot of snow outside and it was 13 degrees this morning (barf).  If spring does ever get here- and I hope it does pretty dang soon- I know one trend I'm definitely going to shop for are some of these cute scallop edge skirts and shorts!  I'm loving them!!! Super cute, feminine, and fun right?

Since we're still in cabin fever mode I figured why not try to DIY it on this chilly Friday night?!? So, I did just that! Time for a Scallop Edge/Hemmed Edge Tutorial, here we go!

I had an old black skirt from Forever 21 in my closet that I thought I'd give a scallop hem DIY a try on.  I figured if it didn't turn out well I wouldn't be mad at ruining an old skirt that I hadn't been wearing, and better yet maybe I'd wear it after making a fresh alteration! 

I started by removing the existing stitched hem using a seam ripper.  Once all of the hem stitching was removed, with the skirt right-side out I turned up the bottom edge of the skirt about four inches and pressed it with a hot iron.

Then it was time to make a template for the scallops.  I wanted to have three scallops on the front and back so I measured the distance across the front and back and divided by three.  Oddly enough, one of our small pots was the perfect size! I traced the circle edge onto some cardstock and cut out the template. 
I lined up the template with the bottom folded edge of the skirt and traced the scallops with sewing chalk.  Then it was finally time to sew- let me warn you this is the tricky part! It wasn't as easy as I thought it'd be.

I set my machine to the smallest stitch length to ensure the hemmed scallop edge would be crisp when turned right-side out.  Then, all I did was follow the traced chalk lines sewing very carefully and SLOWLY.  It's very important to guide the needle carefully so that your scallops will look consistent and round.
After finishing all the stitching, I cut the excess fabric off leaving 1/8" seam allowance.  The last step was turning that bottom scallop edge right side out and pressing the seams with a hot iron for a clean finished look. 

Here's how it turned out, certainly gave that skirt a whole new look and feel!  Loving the scallops, I need to do a pair of shorts next!


You already know I'm Head Over Heels for the scallop edge trend but are you too? 

What about the scallop hem tutorial?  Will you give it a try?

I'm hoping to actually do some work on my closet/dressing room this weekend.  Hope the weather cooperates because I needs to spray paint some accent furniture for the space...  Stay tuned!

Thursday, March 21, 2013

Relocation Reflections

I know I normally stick to home projects or DIY's but my mind seems to be elsewhere, so why not write about it?

Six years ago today we got up at the crack of dawn, had breakfast with family, then hopped in our moving truck and headed to Minneapolis to start a new part of our lives.  I never really forget the day because today is my mom's birthday (Happy Birthday Moo from Boo)!  I know six years isn't a milestone per say, but it's made me think a lot about our "relocation". 

Looking back, when we left Michigan I don't think either one of us thought "oh, we'll be in Minneapolis forever"... maybe we'd move back to Michigan someday?  In the back of my mind I guess I thought we'd be here for three or at most five years. I don't think anyone dreams of living in Minneapolis (especially with this frigid spring weather).  The funny thing is after six years, I'm not sure which place would feel more like home now.  We have friends here, favorite restaurants & shops, events we look forward to, great neighbors, jobs we love, and a house that has become the home we love. 
Alex and I in May 2007 by the Minneapolis Spoonbridge and Cherry
I'm so thankful for all the wonderful blessings Alex and I have because of moving to Minneapolis, and I feel proud of the life we've built together here.  But still, birthdays, holidays, marriages, births, pregnancies, anniversaries, (any celebration really), or even plain-ol days, there are times that I wish I could be closer to the people I love the most. 

I still feel a little bummed when I call my sister, mom, or dad and hear them say "we're having dinner over at so-and-so's house", knowing that I can't join them... Or only seeing my niece and nephew through Facetime.  I love our family and I miss them a lot.  Maybe this all came about because it's my mom's birthday, or my sister-in-law just found she's having a baby boy (Henri's getting a little brother!), or that my niece Brynnan just turned eight months old and I've only seen her in person once.  I guess I feel guilty for not being there as often as I'd like to be there. 

Sure, Michigan is only nine hours away which isn't that bad, and I'm thankful for that.  But sometimes I can't help but wonder how different it'd be if we moved back.  Where would we live, where would we work?  What would I be doing today or this weekend?  I know if I were there today I'd be with my mom watching the Golden Girls while sharing a giant box of Whitman chocolates (she always used to get them on her birthday and lucky for me she'd share).

Anyway, I hope this post wasn't depressing to read but I find blogging to be kind of therapeutic since you get your thoughts and feelings straight as you write.  Like I've said, Minneapolis has become more home to us after six years and we've found a lot of happiness here but some things & people can't be replaced when relocating.  Maybe some of you can relate to these relocation feelings?  I guess I hope there's some of you out there :)

Before I go, just in case (Mom or Holly, I know you are wondering)- no plans to move back to Michigan... still.  However, on a positive note I can't wait to visit with family over Easter!  I can't wait to be with the people I love and miss!

Monday, March 18, 2013

Curtain Rod Shoe & Scarf Storage... and Pig.

Alright I admit it, I was a total loser this weekend.  I didn't work on anything, I didn't get anything done, and worst of all, my closet/dressing room looks just like it did when I posted that preview photo.  Ugh, zero progress makes me feel like a total loser... I'm going to blame the Leprechaun that kidnapped me Saturday night and made me celebrate St. Patty's until the wee hours of Sunday morning.  Evil Leprechaun!

Anyway, I wish I had a more completed look at my Dressing Room but for now I thought I'd share a rod-iculously brilliant DIY storage idea that I incorporated into my new space!   The best part- it's low cost and perfect for shoes & scarves!  Who knew curtain rods and brackets could do this?  Take a look...
Yep, you can store heels, wedges, platforms, pumps, booties, scarves and more!  I know I probably have too many, you do too though right?  Thankfully, this creative storage solution makes managing my growing collection seem less like clutter and more like a beautiful work of wall art! 

To make my shoe and scarf storage, I hit I kea for all the curtain rods and brackets.  I picked up four Racka rods in the 47"-83" length for the shoe wall ($2.99 each), four Racka rods in the 23"-47" length for the scarf wall ($0.99 each), ten of these Betydlig wall brackets from Ikea ($1.49 each) and four additional Betydlig rod holders ($0.49 each).  The total, just $33.00!

 Another great part of this project?  I didn't have to bug Alex, I did it all on my own!  I love those kind of projects sometimes, because Alex typically gets all the glory :)  All I had to do was install the brackets on the walls to hold the rods.  For that all I needed was a tape measure, level, and screwdriver. 

For my shoes, I measured and evenly spaced eight brackets to hold the four longer rods (two brackets for each rod).  Then for my scarves, I measured and evenly spaced four brackets but this time I added the $0.49 additional rod holders. 
So, for my scarves each bracket held two of the smaller rods (bottom left photo).  I have to say, having the double bar bracket allows for so much scarf storage!  I also love having them hanging neatly, so nice that they don't get all creased and wrinkly!

What do you think of the curtain rod turned storage?
What other DIY storage ideas do you have hiding in your closet?
Also very important- Did anyone else get kidnapped by a Leprechaun this weekend?

Before I go, I have to tell you that it was pretty difficult getting pictures of the shoe and scarf storage today.  Someone insisted on being apart of the photoshoot...

Does he seem to be rocking some kind of mohawk action?  When I told Rocco (aka Pig, Piggy, Mr. Pig, Mr. Pigglesworth, etc.), "Move Piggy, you're in the way," he just circled and stuck his face back at the lense.  Silly Pig, such a ham!  A bit annoying, but his cuteness made up for it.  Hope Rocco/Pig made you smile too!   After all, he's convinced that he's the main attraction :)

Friday, March 15, 2013

Head Over Heels DIY Friday: St. Patrick's Day Style!

Good Evenin' Lads and Lassies!!!  Are you feeling the Irish spirit yet?  Obvious I am, so I couldn't think of anything more perfect to share on this Head Over Heels Friday than some of my favorite St. Patrick's Day themed DIY's!  From fashion, to food or pets, you can theme up lots of fun stuff or class up your celebration with a tasting party!  Love it!
St Patty's Pom Pom Shoe Clips via Lovely Indeed  Hat and Beard Photo Props via Etsy-The Manic Moose  Shamrock Shakes via Number 2 Pencil  Beer Tasting Party Decor via Design Sponge  St Patrick's Dog Bow Collars via Love Maegan Lucky Clover Coin Bags via One Charming Party 

Ummm, who else wants to make giant green Pom Pom Shoe Clips for Sunday?!?  I know I do!  I also need to make Rocco and Sadie some green attire- they are too cute to get pinched!  Aside from what I want to make, I actually did one of these DIY's today at work! We made our own Shamrock Shakes and they were a hit!  Super easy too, highly recommend if you need a fun St. Patty's day treat (and don't want to hit a McDonalds)!

Which idea are you Head Over Heels for?
Do you have any other DIY favorites for St. Patrick's Day?

If you are out guzzling celebrating with some Irish styled green beer this weekend, be safe!  Have a great weekend everybody!

Thursday, March 14, 2013

Indoor Spring Floral Decor

Even though it snowed last night here in Minneapolis, it feels a bit more Spring-like inside our house because of these fresh and pretty florals!
Even though I'm mainly working on my Dressing Room/ Closet right now, I had been wanting to update the decor on our dining room sideboard/ buffet since Christmas and I'm loving this fresh green look!

The idea for this started with an unplanned trip to Bachman's Floral & Garden Shop.  I wanted to give "indoor gardening" a try with those cloches I used in my Holiday centerpiece decor.  I picked up two cute little Kalancho succulent flowering plants, a Babytear plant, and a Selagine plant.

I'm still new to any kind of gardening so I just picked them because they were cute (my main goal is to not kill them in a week's time).  I guess it will be good practice for actual outdoor gardening this spring and summer!  I was starting to dig it last year :)  hehe, that was a good nerdy word pun!

I added the plants to a few cute pots, vases, and two antique glass cups that were my grandma's.  Probably not at all what they were intended for but I love the unique look- and they make me smile!

I rounded out the look with a wreath I had on our front door last summer (love finding those fun forgotten things in the basement!) and two vases filled with Waxflower on each side.


What do you think of the fresh floral look? 
Are you excited for outdoor gardening season to start soon too?

Honestly, those real flowers sure beat my paper floral creation, LOL!  I just hope I don't kill these... at least right away!  See you tomorrow for Head Over Heels DIY Friday!

Tuesday, March 12, 2013

Dressing Room (2.0) Progress

Anyone else feel like they are playing catch up even though it's only Tuesday?  Yuck!  It's a busy week at home and at work but regardless, I wanted to share a bit of what's been going on with my Dressing Room/Closet project! 

I rearranged the layout of the room, added another garment rack, dresser, bars to hang scarves, wall hooks, and my personal favorite... a wall dedicated to my signature (and in most of the time necessary) heels!  Who doesn't need a place to hang their hat heels, right ladies???

Oh, I guess I have to mention another favorite and that's the $3.00 Vintage Chair I scored from Goodwill that I revamped (click here to check out that redo!).  It has such a gorgeous feminine feel to it, lends itself perfectly for my Dressing Room!

More to come on this space, it's not complete yet!  I hope you'll stop back to see how it turns out!

Friday, March 8, 2013

Head Over Heels DIY Friday: Hand Cut Chinese Paper Wall Art

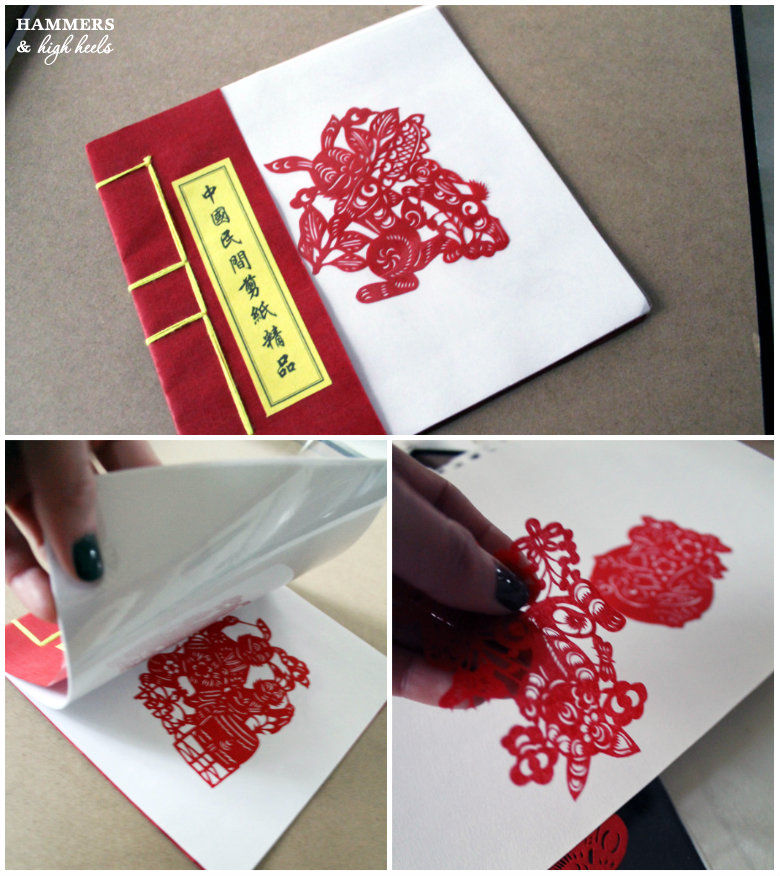
Remember a while back when I shared some of my Decor Finds from China and India?  Well, I finally figured out how to take these handmade Chinese paper cuttings and turn them into a beautiful home decor piece!  So what did I create???

This double layered glass wall art piece!
Thank you again Sunny for the nice gift from Shanghai!
All I got to make this was a double layer glass frame from Home Goods and some thin/wide woven burlap. I placed the burlap between the glass then took each paper cutting out of the booklet and placed them on the burlap.  Easy-peasy! 

I love how the double layered glass allows the hand cut paper to create shadows on the wall behind.  It adds a lot of dimension and interest, just feels like a special way to display this handmade art.  I also realized while arranging the cut papers that they seem to tell a story or set a scene maybe?
All of the characters in my little booklet were rabbits and they were dancing or playing instruments.  They all look so happy, like they are at a big party or something?  I think my favorite hand cut character is that little rabbit with the Chinese symbols (above left photo, bottom right corner).  He looks like he is laughing right?  It's so cute and fun!  I guess it is open to interpretation though as most art is! 

I know I am Head Over Heels though, especially when I discovered the story/scene!

Now, I still need to figure out what to do with this 16" x 24" tapestry I got from the Delhi Haat Market in India .  I just love how authentic and worn it feels, it's a perfect well travelled find right?!  I want to do something more creative than just framing it since it is fabric, but I'm kinda stumped for ideas still.  I know I don't want to sew it onto anything either... 
... hmmm.  Anyone have a fantastically creative idea for this tapestry?!?!  I'd love some help on this one, it's just been sitting folded up in my closet since my trip (sad).

Speaking of my closet, I'll be working on that this weekend and plan to share my first progress pics on Sunday/Monday!  See ya then, have a great weekend!

If you want to see my China & India Trip Photos click here for 2012 and here for my 2013 trip!

Wednesday, March 6, 2013

The Last "Blast"?

Since moving to Minnesota I've always heard people say, "Before spring comes, we'll get one last blast of winter, there's always that last BIG blast."  Now that we've been through six winters here I'd say for the most part that has always been true.  Just when you think winter is on it's way out because it gets a bit warmer outside, the snow begins to melt, the days get longer, and the sun is shining everyday -BOOM- that's when it happens.  Winter comes back and pretty much smacks you in the face.

We got smacked with ten inches of snow yesterday, which piled on top of the half melted frozen snow that was already there.  Why Minnesota, why?!?!  Can't winter just make a graceful exit once and a while?  I guess there's a lot of you out there that might be experiencing the same thing though since the storm headed east.  The good thing is that once the snow stopped falling the sun came out and it was actually quite beautiful outside.... 
Thanks Nick for capturing this beautiful winter sunset in Minneapolis!
Maybe that is winter smiling and saying goodbye? I can only hope so, I'm so ready to get out of the house!  Better yet, our days will feel longer on Sunday because of Daylight Savings!!!!  Did you know it was this Sunday?  Neither did I, but I can't wait for my daylight hours in the evening!

Are you pumped for Daylight Savings on Sunday too?
Did you get hit with the same snow storm that came through Minneapolis? How much snow did you get? 

Monday, March 4, 2013

Unfinished House Projects

Unfinished house projects.... they kind of haunt you right?  Alex and I have two in our house- the Office and my Dressing Room.  Neither one got completely finished up...

Since finishing up our Kitchen Project, Alex and I have been wondering about what we should tackle next.  We both agreed that we should take on one of these projects, at least then the haunting will go away too :) but which one???

So to get you up to speed on what we did and where we left off here's some background....


In the Office room, we did remove the carpet and paint the walls about 3 years ago.  When the tornado happened though we had some water damage in the ceiling and that had to be redone.  After that I decided to change the paint thinking we were ready to turn the room into an Office officially.  (The photos below illustrate the progression)
But, after I painted nothing happened.  I guess during the "Upstairs Shuffle" we ended up losing interest in finishing the Office and ended up working on our Master Bedroom redo.  So, that is one we still need to tackle.    BUT...

I think I am leaning more toward finishing up my Dressing Room (that sounds like more fun, right?).  In case you aren't familiar with the old posts on this room, it is located off of our Master Bedroom and only accessible from it.  Alex removed the old carpet and installed new wood flooring, then we added some window treatments thinking it might be a nice sitting area/reading kind of room.
Sadly, we quickly learned that the long narrow space didn't make sense at all for a sitting room and that it might be better suited for a small bowling alley or closet- especially since we have very limited storage space!

I took a stab at making this dressing room space TWO YEARS ago (yes, slightly embarrassed about this photo, not my proudest creation at all, barf!) and haven't talked about it since. 
I actually ended up taking it all apart not long after and moving things around to make it larger and more useful.   I think I have been tinkering with it for the past two years waiting for it to feel right before I started talking about it again on the blog.  Thankfully, it's finally feeling right!!!! 

I think I'm leaning towards tackling my Dressing Room Project 2.0.  I feel like it's in a good spot to start sharing.  I guess I wish we could tackle both of them and get them completed but we know never break the cardinal house project rule (only one project at a time!).

Are you more excited about the Dressing Room or the Office? 
Do you have any unfinished projects that are haunting you at home too?

Friday, March 1, 2013

Hammers and High Heels DIY Friday: Framed Paper Florals

This week's DIY is all about my inspiration from earlier this week-  paper!  Yes, pretty floral paper creations!  I know it sounds kind of strange, but I'm Head Over Heels for these Framed Paper Floral creations!

All you need to make them is a frame (or two), paper, fabric, scissors, tape, glue (Elmers is fine), and small pins.
To make my framed paper floral creation, I started by making the individual flowers.  I used the floral shapes from my inspiration post and focused on making four types of flowers in various sizes.  I nicknamed the types of flowers petal, accordion, circles, and 4-fold. 

First up is the petal- Cut 4 drop shaped petals, pinch the narrow end and glue, then glue the dry petal ends together.  You will have to sort of hold the four petals together until the glue dries a bit.

Now to the accordion- Fold up a square piece of paper accordion style, staple through the center, with scissors cut the front side at an angle on each end, then open and glue ends together.

For the circle style flower- start by cutting circles in varying sizes (they don't have to be perfect), cut 3-5 to make a nice flower shape, Fold part of the circle inward to make the circle turn into a cone shape (you can fold in as little or as much as you want depending on how you want the flower to look), glue the folds in place, once you've made the circles into cones layer from largest to small and glue in place.

Last is the 4-fold- Fold a square piece of paper in half and fold that in half again, on folded sides cut two half petal shapes, unfold.  You can repeat and layer on an additional 4-fold or leave on it's own.

After I finished making a good-lookin' gang of paper florals, I prepped the frames by removing the glass fronts.  Then I took some faux linen fabric and wrapped it on the frame backing with tape (yes it looks icky but I didn't want to use anything permanent). 
Once the fabric was set on the frames it was time to add the flowers! 

I laid them on the frames to plan out an arrangement, then all I did to attach them was pin them onto the fabric.  In an effort to not smash the paper, I carefully pinned through the flower first so all I had to do was push the pin into the fabric. 
That attachment technique seemed to work nicely (progress image above).


To bring some spring into our Living Room, I decided to add the two finished Paper Floral Frames to our mantel.  Since it's technically still winter, I left the birch branches but I added a bit of green moss in for an early fresh spring feel.

I think the Framed Paper Florals turned out to be a good winter/spring transition look for our mantel decor- certainly a unique decor addition as well! 

What do you think of this little DIY project?  Are you Head Over Heels?
What other creations would you make with paper flowers?
I have to say, making all those little flowers was kind of fun but a little annoying at first.  Took a bit to get the hang of it but thankfully no papercuts here :)  I might try making a wreath next in some bolder colors! 

Alex and I are cooking up ideas for our next home project, hope to share some of that news next!  Have a great weekend!