Friday, July 19, 2013

Head Over Heels DIY Friday: Staple Gun Seat Tufting

I attacked a DIY that I've never done before- tufting!  I had always been afraid to try it myself but it turned out to be easier than I thought it would be and I'm very thankful for that considering it has been the only thing that went as planned when it came to my "Stupid" Chair redo project. 

So, after all the failed fabric choices, painting, and repainting I made the decision to go with a dark burgundy fabric to compliment the midnight navy blue chair color.  But to give the solid color surface some interest and dimension, I knew it was time to figure out how to add some tufting.  Dun-dun- dunnnn....
When it came to DIY tufting, I had only seen folks do it by drilling a hole, sewing on a button through that hole, and a bunch of other random steps along the way which made it seem to complicated.  I wondered if it was possible to get the look just using a staple gun because let's face it, a staple gun is much more user friendly than a power drill (and requires no over-the-shoulder supervision from Alex, LOL). 

I started by marking the placement for each button/tuft that would be on the seat cushion.  In order to make sure the fabric would spread and tuck evenly outward, I marked the first tuft in the center of the cushion and measured out 6.5" from there for the other four tufts. 
Then, I used scissors to sort of carve out the foam in the marked spots.  This allows a clear path for the staple gun to staple directly into the wood surface beneath the foam. 

I added my first staple in that center position so that I could work the fabric evenly outward from there. After I got the first staple in place, I pressed my finger into the spot where the next staple would go to test out how the fabric would lay and fold out.  I did this to make sure I wasn't stapling the fabric too loose or tight.
It takes a bit of folding, pulling, adjusting, and readjusting to get the look of the fabric just right as it folds out from each tuft.  It is a bit tricky but you'll get a feel for it after you do a couple.

Once I had all the tufts in place, I pulled the fabric taut and began to staple it in place on the underside of the seat cushion (stapling into the wood).  This part also called for some more pulling and folding to keep the wrapped edge and center tufts looking clean and crisp.
After you finish stapling, you have a tufted cushion!

The last step is to then add buttons to cover the stapled tufts- and this part is the only unique challenge with the staple gun tufting method (but honestly not as bad as that whole drilling and sewing through drilled holes thing).  Since I didn't have buttons that matched the color and fabric I had chosen, I dug some out from my button bin to cover with the fabric.  I simply cut a small circle of fabric and tied the wrapped fabric to the bottom loop of the button.... 
After I had the matching buttons ready I threaded my sewing needle, pushed the foam around the stapled tuft down, and stitched the button into place.  I learned that it would have been easier to do with an upholstery needle instead of the straight needle shown in my photos because that foam will fight back when you move your needle!

With all the fabric secured underneath, my cushion was complete!  One cushion down, one to go, but here's a sneak peek of the chair color and fabric cushion combo...

I'm already Head Over Heels!  Can't wait to have two of them!

What do you think of the fabric and color choice?  Are you liking the tufting? 

Hope to work on the next cushion tonight and have some after pics of the set along with decorative pillows tomorrow!  I'm excited for this heat wave to break tomorrow, hooray!  Have a lovely weekend everyone!

Monday, July 15, 2013

Pinning, Painting, & Manly-Pinning

Okay, I have some "Stupid Chairs" progress but that is only because of all the nice comments and suggestions everyone offered!  I was in a total rut and feel so thankful to all of you who reached out, so special thank you to Amber, Genevieve, C.E.R., Pine Tree Home, Charlotte, Mdegraeve,   Vanessa, Dyana, Bev, and a couple anonymous others- I really appreciated hearing your thoughts :) I think it helped turn a daunting, poopy, negative feeling project back into the fun, creative project it was intended to be!

With that, it seemed like the consensus was that I should stick with a nice solid fabric for the seat and save the cute patterned fabric idea for a decorative pillow- made total sense, why didn't I realize that?! Because honestly, it's a lot more likely that I will get tired of a pattern in a couple months and want to change it, and that is a lot easier to do on a pillow than on a seat cover.

From there I hopped on Pinterest and started pinning chair styles that I liked.  Here's a little glimpse of the favorites from my board...

Sure, they all look kind of plain but that is exactly what I needed- they all look plain!  They all look something- plain! 

I narrowed in on the look I need, the style I'm most drawn to, and that made the decision to paint the chairs (again) easy... even though I didn't want to.  Yes, I loved the color I had painted them (Rustoleum's Night Tide) but it just wasn't working.  After my Pinterest research, I felt 100% confident in my choice to paint them Rustoleum's Midnight Navy Blue.  Funny enough, the Night Tide to Midnight Navy Blue ombre I witnessed during painting was kind of strangely beautiful....
Right?  The in-between stage looked summery and pretty I guess?  Anyway, from there it went to here...

... and with the sundown, artificial light on, I am all the more happy with my color decision!  It's the right hint of dark blue color in the sun and looks pretty much black/brown when it's gone!  LOL, the rhyme makes it right!
 So, I'm feeling good about where things are at now and it's ready for fabric and finishing!  Woot! 

Lastly, kind of related/un-related but funny either way.  My hubby discovered Pinterest on Sunday and reacted like most people that start tinkering on it do- scrolling, clicking, searching- and dun, dun, dun- pinning! 

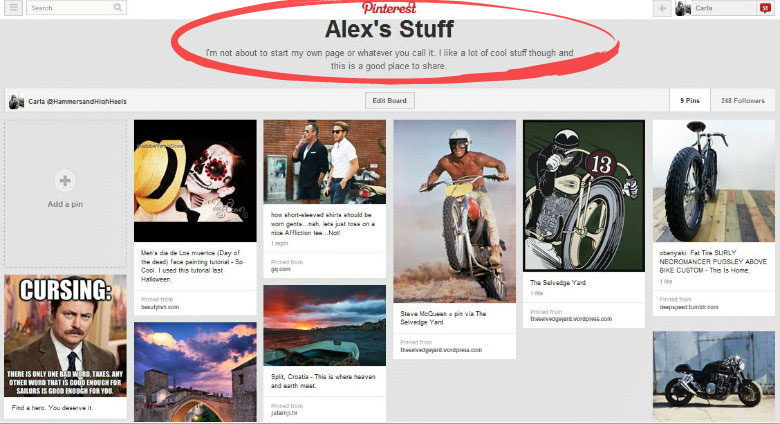
Yep, Alex asked how to "save" something and I shared how "pinning" works (create an account, name, boards, etc.).  Despite my it's so easy tutorial, Alex gave me the - it sounds too complicated, I'm zoning out- type of look and opted for his own version of "save" on Pinterest.  So what you see below is Alex's board my Pinterest page, description listed as "I'm not about to start my own page or whatever you call it.  I like a lot of cool stuff though and this is a good place to share."
So, for anyone following Hammers and High Heels on Pinterest, that's the story of how Alex's board came to be (and why that weirdness exists in my pretty board world).  I only hope nothing too strange or offensive shows up on his boards, because yes boys are just weird and gross sometimes (right? it's just a known fact kind of thing I think?).  So Alex knows I will promptly delete and let him begin his own Pinterest union if necessary.  Manly pinning- oh dear!

Until next time- Chair is To-Be-Continued awaiting my fabric application, stay tuned!

But I have to know, anyone else have a spouse/partner/friend/ family member squatting or hijacking their Pinterest page too?!?  Are you letting them keep it or make their own?

Friday, July 12, 2013

Head Over Heels DIY Friday: Window Screen Repair & Replacement

Does anyone else have a not-so-perfect looking window screen at home that is in need of repair or replacement?  I know we do but what I didn't know until yesterday was how easy it is to fix DIY style thanks to my friend/carpooler extraordinaire Dean! 

You might remember Dean from my antiquing/speeding ticket post but we've been co-workers, friends, neighbors, and uber fans of The Golden Girls and the movie Overboard for quiet sometime now.  Anyway, when I heard that he was going to replace some screens after work I said, "Tell me more Dean!" and politely begged asked if I could come over and see how it's done.  Thankfully Dean said okay and I have the DIY steps to share with you today (thanks Dean)!

The materials you need are replacement screening and vinyl retainer (size depends on your window or door) but most home improvement stores carry kits that include vinyl retainer and a handy installation tool!  Dean picked this one up for just $10.97.
In order to remove the screen frame, Dean began by taking down his storm window to access it (note, beginning steps will be different depending on the type of window or door you have the screen in).   
Once you have the framed screen out, remove the old vinyl retainer and take the old screen out.
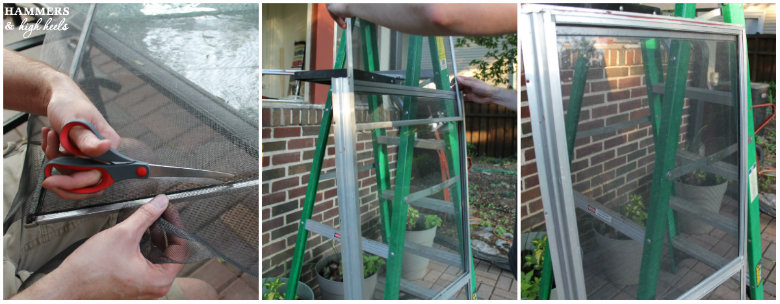
Then lay the screen frame down with the retainer groove side faced up, place the new replacement screen over the frame with at least 1/2" of the screen extending beyond the retainer groove on all sides (Dean left more than the 1/2" recommendation and trimmed the excess with scissors afterward which also seemed to work just fine).

The next step was to add the vinyl retainer into the groove using the bevel or concave edge wheel on the installation tool.  Starting in a corner and working in one direction all the way around, Dean lightly pushed the vinyl retaining into the groove. 
He also made sure to pull the screen slightly away from the corner he was moving towards to make sure that the screen mesh would lay straight along the groove.

After the screen was installed, Dean trimmed the excess mesh around the four sides.  The, it was ready to place back into the storm window.
Not too bad right?  Maybe I am a nerd for not knowing that screen replacement would be that simple, but now that I know I want to replace the screen on our back sliding door that leads to our deck.  Sadly, Sadie seemed to forget that the screen door existed every time spring rolled around.  The first few warm days we left the sliding glass door open she would run smack into it, poor little simple Sadie! 

I'm Head Over Heels for this DIY knowing I won't have to look at that icky slider door screen anymore!  Just have to hope Sadie won't have the same trouble next spring though I guess?

How about you?
Did you know screen replacement was that easy?
Are you going to replace any window or door screens with a screen repair kit too?

PS- I've been trying to get Dean to do the Golden Girls with me for Halloween for two or three years now, wouldn't we make a killer Dorothy and Sophia?!?!  I hope this convinces him, what do you think?

Tuesday, July 9, 2013

Stupid Chairs

I hate getting stuck on any project, but I really hate it when I get stuck on the small ones that were supposed to be easy.  Case in point, those chairs I got a few weeks ago from a yard sale for just $20 thinking, "Oh I'll just paint them and reupholster the seats, it'll be so easy!"  Silly Carla, you were so wrong.  Yep, those stupid chairs are sitting in our sunroom, still unfinished, and I swear they are taunting me!  Its a stupid chair for poop's sake, why don't I have this done yet? All I have to do is the fabric and paint the wood, that's it! But instead of easy, this is what happened instead.....
Fabric I picked out online. FAIL.
Fabric I picked out at a Vintage Sale. Again, FAIL....
Given that the fabric search wasn't going well I thought I'd just paint the wood a color I liked and then I'd be sure to find a fabric to match the wood color!
Nope, that also turned out to be a bad idea after I spent and hour at SR Harris wrestling through their MEGA warehouse of fabric only to rush as they were closing and quickly grabbed two moderately priced patterns that might work and took them home to show Alex.  As I pulled them out of the bag, I quickly realized the mistake I had made before he had to say "That one looks like grandma print and that one looks like a bunch of sparkly pot leaves." EPIC FAIL.
What was I thinking? I mean seriously? The toile isn't terrible but yea, that leaf is bad, so so bad!  I thought it was kind of like the Palm Leaf print trend I've been seeing but NO, not at all! Now I can't decide which part is worse, the fact that I've wasted close to $70 on fabric or that I may have to sand and repaint the chairs a different color.  Money or manual labor? Hmmm, still both equally bad :(

Either way, I'm just bummed and annoyed at this point.  I wish I was sharing finished pics instead of complaining but I guess that is just the truth- not every project (big or small) goes smoothly or the way you plan sometimes and I shouldn't let it bug me so much... even though it still does, I'm trying to let it go though!

So now it's time to take one last stab and finishing these chairs up.... and if things don't pan out I'm just going to set them on fire in a fit of anger.  Whoops, did I say that out loud?!  I don't think I'd go that far, but I kind of feel like it right now, ha!  I'm thinking I might just have to give up on the colorful idea and go back to a simpler look because that is honestly more my style and I should just go with it!

I'd love any ideas/suggestions!  Really, someone just tell me what to do! 
Do I leave the paint color?  If so, what fabric color or print should I add?
Should I paint the wood a different color?  Then what color or print should I use for the cushion?

Friday, July 5, 2013

Head Over Heels DIY Friday: Heather's Master Bedroom Update

A couple week's ago my cousin's wife Heather asked me for some decor advice for their Master Bedroom so I decided to pull together some ideas that she'd (hopefully) be Head Over Heels for! 

Heather purchased the Lucianna Duvet from Pottery Barn to kick off her redecorating project and hoped to add in a robin's egg blue as an accent color.  To get an idea of the space, I asked her to sent a couple photos so I could get an idea of how to bring the colors together...

She also mentioned that she needed ideas for wall art above their headboard.  So, after a little online "window" shopping, here's what I came up with....
Pillow Target $33.00  Diamond Pillow: Target $16.99  Threshold Fretwork Border Window Panel: Target $24.99  Threshold Tear Drop Glass Lamp Base: Target $46.99  Threshold Burlap Lamp Shade: Target $15.79   Ribba Photo Frames: Ikea $14.99

Since the wood tone of the headboard felt similar to the wall color, I thought it would pop better if it were painted white (gotta have a little DIY action right?) and the white matches the wood trim in the room as well.  The rest of the accessories all came from Target (Heather already has the lamp & shade) except the photo wall frames, but I imagine Target has similar frames too.  I even found a few things I wanted for our house during my online "window" shopping which includes those Fretwork window panels, they come in like five colors and I love them all!
Now Heather can decide if she is Head Over Heels for look or not but I hope she is (I know I am)!  I had fun putting together the idea board too, so if anyone else needs some ideas for a room feel free to send me an email!

What do you think of the look? 
What other ideas do you have for Heather for their Bedroom?

Thursday, July 4, 2013

Last Minute Fourth of July Decor at the Hammers and High Heels House

Happy Fourth of July everybody!  Although it was kind of last minute, we decided that it'd be fun to just have a low-key kind of backyard barbecue with some friends and neighbors.  Naturally, I had to do some last minute decorating to give our home some patriotic spirit (which included our dogs too, they're proud little American pups)!
All I used to decorate were six flags (2 small, 2 medium, and 2 large sizes) and four rolls of decorative ribbon from JoAnne's which totalled under $10!   I hung the flags from our mantel with some galvanized metal ribbons I had from Bachmans, so simple and I love the classic American look!
In the Dining Room, I hung the flags similar to the mantel over our sideboard then wrapped some ribbon around the lanterns, wreath, and a small floral centerpiece.  Super simple right?  But it totally fits the feel of the Fourth!
Honestly, I'm pretty surprised with how nice my last minute decorating efforts turned out! Usually last minute doesn't go that well for me.  I wish I decorated a couple weeks ago so I could enjoy the look a bit longer :)


How about you? 
What kind of simple Fourth of July decor tips do you have?
What will you be doing to celebrate the Fourth?

Have fun celebrating our country's independence and freedom today!  Happy Fourth of July!

Tuesday, July 2, 2013

Uncle Alex Good, Auntie Carla Bad

You can't win them all right?  Well, that saying was especially true this weekend when my sister Holly, brother-in-law Brian, and our (almost) one year old niece Brynnan came from Michigan to Minneapolis for a visit.  Why you ask?  Well on the very first day they arrived, Brynnan warmed up to her Uncle Alex right away and when it came to her Auntie Carla, well you get the idea based on Exhibit A below....
Exhibit A
Yep, Uncle Alex got sweet, cute, snuggly, cuddly love from Brynn and the reaction I got was an expression of shear terror followed by loud cries for mom.   It was so sad!  I thought if either of us could have the upper hand in the like-ability area with Brynn it would be me considering I look like her mom and for petes-sake am blood related to her mom. 

Yep, this type of reaction happened over and over as shown in Exhibit B.  Perhaps the worst though was seeing Alex's smug grin when he would happily hold her with no cries or sign or terror in her eyes.  Ugh, it was so, so, so smug. 
Exhibit B
I know it might be because we live far away and she doesn't see us much (which alone makes me feel sad) but I hope it won't be that way next time I see her. Who wouldn't feel sad making a cute baby cry?  Feels pretty crummy especially when you are her Auntie!

Despite feeling bummed that I couldn't hold Brynn as much as I wanted to, we still had lots of fun hanging out and catching up over the weekend. A few highlights included lunch and pictures by the Mississippi Riverfront...

Lots of playing at home and out-and-about with Brynn...
Goodness, that blonde hair and those blue eyes are the sweetest thing right?!?!
But our favorite of the weekend visit was the Como Zoo and Conservatory.  Brynn liked the action at the Zoo but I think she loved the trees and plants at the Conservatory even more! 

... and Auntie Carla loved that she got to take some adorable photos of a very happy Brynnan!

Now before I end this post, wouldn't ya know it-  There's a surprise-twist ending! (Thankfully)

Just before their Minnesota visit came to a close, I sat down with Brynn at the bottom of our staircase and she didn't get upset... she SMILED!  Yaaayyy!  I was so happy and even happier that Brian had a camera close enough to capture the moment.  I love our photo together, makes me a happy Auntie Carla :)
PS- did you notice the unhappy furry little head in the corner of the photo?  Perhaps my first born was jealous like I was of Alex?!?!?  Probably not, but it's pretty strange/funny that Rocco managed to wedge his head in my glorious moment, ha!

Well that was it for our family visit and we loved every minute! 
Now, how about you? Will you have family visiting over the Fourth of July holiday?  If you do and you have little nieces or nephews, I wish you better luck than I had at the beginning :) I hope everyone has a wonderful 4th and remembers to be thankful for our country's independence. I also must say thank you to all of the men and women that still protect our freedoms everyday!

Be safe, have lots of fun, and enjoy the fireworks!